by Stan Logan | Jun 20, 2021 | Butterflies
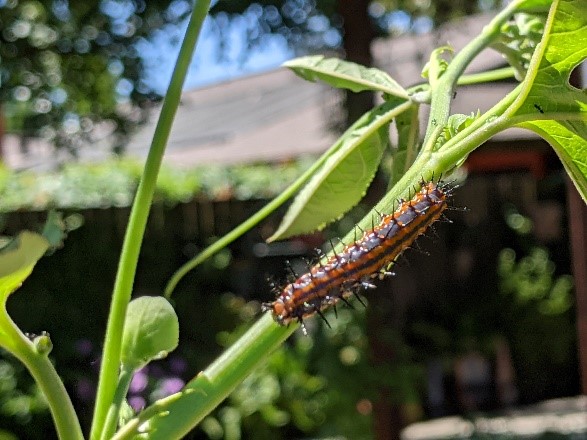
Today (June 16) my wife is thrilled. Caterpillars are eating her passion vines. Not only that—the adults are doing a little dance to spread their pheromones. Soon there will be Gulf Fritillaries all over the back yard. If you are interested in attracting butterflies to your yard, your best chance is to grow either Passiflora caerulea or Passiflora edulis in your garden. Many other passion vines are not attractive to this butterfly, especially those with red flowers.
LaVille will not have vines available at the upcoming Fall sale, but if you are eager, you can come over to the house and she can give you cuttings to give you a head start on next Spring’s growth. I suggest you come early while there is still plant material left over from voracious larval munching (just kidding).
Stan, The Happy Husband
Caterpillar on Passion Vine
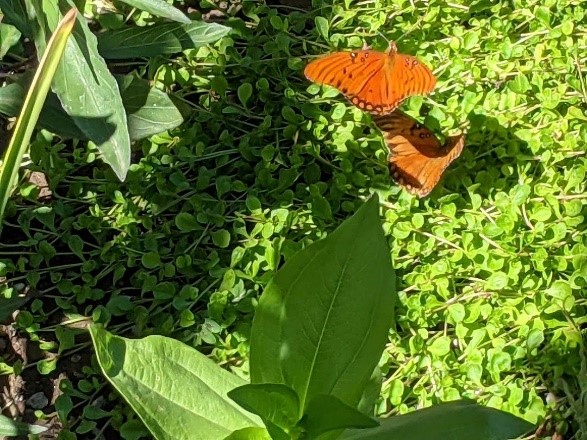
Gulf Fritillaries
by Guest Contributor | Jun 19, 2021 | Propagation
by LaVille Logan
If you have read Pot and Re-pot (Blog #4), you’ll realize that I use a lot of containers of different sizes. Keeping these organized and available for re-use can be a chore. I use and re-use the smallest sizes constantly. I do not sterilize between uses, but Stan retrieves the used cups from a plastic milk crate and while seated on an upturned 3 gal. bucket, washes them over the lawn and scrubs each out with a circular brush. He stacks them in the crate again. I have so many he has only had to do this twice. I use the same crate to stack the used ones, and the stacks get tall but one crate seems to be just fine. (I wonder how long it has been since milk crates have been used for hauling milk). The larger 1 and 2 gal. pots are stacked against our side fence. Since many plants are sold in the larger sizes, we need to replenish them, and many trips to the local nursery to check the recycle bin has kept our supply healthy. Go out to your storage area to see if you have something like a milk crate in which to stack smaller useful square or round pots. Taking and planting cuttings is complicated, and it helps to keep the many necessary items in some sort of order.
by Guest Contributor | Jun 18, 2021 | Propagation
by LaVille Logan
Choosing the right container for your cuttings will increase success and keeping an eye on root development is necessary. Knock the plant out of its pot to see if the roots are filling up.
- Choose a pot at least 2” to 3” larger. Any larger encourages over watering.
- Put a bit of E.B. Stone Sure Start on the new mix so roots come in contact.
- For anything but a tree, 1 gal. is a large enough pot. This keeps the digging reasonable when placing in garden.
Save your used containers. Rinse them out, use again. I have used my smallest containers over and over.
by Stan Logan | Jun 17, 2021 | Irrigation
I have been trying to be able to write a comprehensive article about drip systems. I began with a list of a half dozen mistakes that I have made. I then thought I could add to my list of suggestions by viewing a few YouTube videos. Well, this went on for hours. I ended up with 2 full pages of notes. It was then that I realized that there is too much information to put into a single article. No one is going to read an article pages long. So, instead, if you are truly interested in creating a drip system, you need to do your own research. The best single YouTube program I found can be reached by googling “YouTube Drip System Watters Garden Center”. Now there are 3 videos—view the 2015 version. This is a program put on by the owner of a nursery in Prescott, AZ. He will give you a lot of practical information. If you are not yet saturated with him, simply Google “YouTube Drip Irrigation” and check out more videos.
Now I will try to add ideas that you may have missed:
If you have distance separated plants, for instance potted plants, then using drip emitters is wise. If you have plants densely planted or areas of ground cover, then using mini sprayers would be better. You cannot use drippers and sprayers on the same system. If you choose sprayers, you need to see me before buying items. I will get you started right.
Whatever system you use, try to buy parts made by the same company so they are compatible. Rain Bird seems to be the most common drip system brand. I just checked out at Home Depot, and that seemed to be just about all they carried—which was a lot! I particularly suggest buying the Rain Bird ½” couplers because they will handle all the various brands of “half inch” delivering tubing that will vary a lot in size. But order your ¼ inch delivery tubing from Amazon: “MIXC ¼ inch Blank Distribution Tubing Drip Irrigation Hose”. This is superior product. Attach the ¼ tubing to the barbed coupling first before insertion and grab the coupling with pliers to give you more leverage when forcing the coupling into the ½ inch delivery tube.
I’m going to assume that you are going to hook to a hose bib. If that bib is attached to your house, make sure it’s not delivering softened water—not a good thing. If you are buying connectors that are threaded, remember that pipe thread and hose thread are different.
If you have plantings that are lined up like in a vegetable garden, your best bet would be the tubing that contains inline pressure compensating emitters. Limit ¼ inch line runs to 25 feet. ½ inch lines can go hundreds of feet. I recommend these inline emitters over rubber soaker hose or T-tape. Run your inline system first before planting so you can see where the moist soil will be.
You barely need to cover delivery tubing if you choose to. Sun exposed tubing will last for 10 to 15 years. Then too, covered tubing won’t be tripped over. Leave the ends of lines exposed or at least located so they can be found and opened for flushing once a year. Also, flush out a line before using it the first time.
You can make staples to hold down tubing out of wire coat hangers. I can do this for you.
You will have to have different systems for trees and shrubs vs. flowering plants. One system is for infrequent deep watering and the other is for more frequent short watering.
Set your timer to water very early in the morning, but occasionally run the system briefly while you are out there to detect problems.
Plan on expanding your system as you do more planting and as plants get bigger and need more emitters surrounding them.
Don’t forget to buy a backflow preventer, timer, filter, pressure regulator and a Y splitter with valves so you can still attach a hose at the hose bib.
Good luck! Stan (You may simply call me Dr. Drip.)
by Stan Logan | Jun 8, 2021 | Garden pests, Garden tools
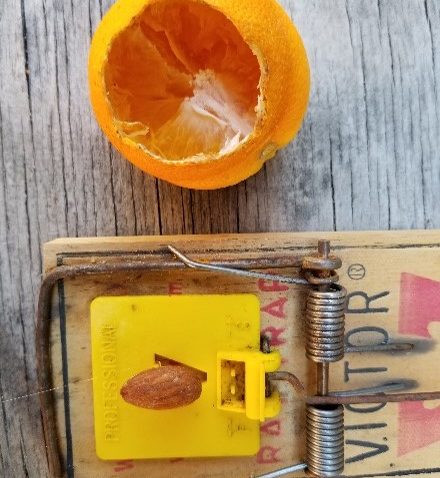
I’ll bet you do have nuts! As I look across the kitchen from where I am writing, I see a big jar of Planters peanuts and next to it is another big jar of Kirkland’s Marcona Almonds. (These are SO GOOD! but the store supply is seasonal, so you need to buy many jars when they are in.) Right next to the jars is the frig where we keep the walnuts. (I don’t know why.) Just checked the pantry and found an unopened bag of Blue Diamond lightly salted almonds. Anyway, we definitely got nuts, and I bet you do too.
Now, how about rats? Do you have rats? We have rats because we have citrus trees. Unfortunately we park our cars in the driveway nearby and rats love to make a nest in the engine compartment. Those little b*#&+%s (I’ve never sworn in a blog before—can you tell?) ate wiring in our Yukon. That was expensive. They also did a job on our air conditioning condenser on the other side of the house. Not cheap either. Anyway . . . we know rats. We have also killed a lot of rats, and one of the problems is disposing of the carcass. If you just put it in the garbage, it will probably stink up that whole side of the house even when you bag it. We have had to resort to double Ziploc bagging the varmint and putting it in the freezer until garbage day. The problem is that we often forget it, and when we discover it several weeks later when looking for dinner, it’s rather disturbing.
Now, how about tomatoes? Since you are a gardener in the Sacramento Valley, I know you have tomato plants—It’s the law. Don’t you just hate it when a rat gets into your tomato plant and takes just one bite out of your best tomatoes? (Insert you own swear word here: ____________.
Now that we have determined you have nuts, rats, and tomatoes, let’s get ready to kill those suckers. (Is that swearing?) You have baited your rat traps with peanut butter before, and that works well, but I am always disappointed when the ants get to the bait first, leaving me with a very clean, empty trap. Here is what you need to do. Take one of your nuts—preferably an almond—and hot glue it to the trip pedal. Do this before you set the trap, or you will end up with hot glue everywhere! Now you have a trap that can be used over and over.
I’ll leave trap placement up to you. One of my favorites is to secure it to the limb of a citrus tree with green tape or a zip tie. Somehow it is more satisfying to find a rat hanging suspended from a trap. I have also found it advantageous to drill a hole in the corner of the trap and attach a cord when positioning a trap on a fence or on a ledge.
I know you hate to give up a nut, but it’s only one. I was going to use a marcona almond, but couldn’t bear to lose one, and opened the Blue Diamond bag instead.
Rat trap baited with almond
Happy trapping, Stan, The Nut Man
P.S. I just ordered an ultrasonic rodent repellant deterrent device from Amazon that will attach to my new car’s battery. I figure $24 is cheap insurance preventing over $1000 worth of damage.
by Stan Logan | Jun 7, 2021 | Garden tools
There was once an old man that lived down the street. Along with other home owners in the neighborhood, he had a magnolia tree growing in the middle of his front lawn. Every day I would see him wandering all over the lawn picking up magnolia leaves with a grabber. I assumed he probably was too stiff to bend over, or perhaps was fearful of doing a face plant on display for the entire neighborhood. He eventually had the tree cut down so the only time I would see him is when he would drive by. Dr. Chambers died probably 30 years ago.
I recently spruced up my front landscape with a yard and a half of mini bark from Hasties. I appreciate the improvement so much that I constantly am out there with a grabber picking up the magnolia leaves that my nextdoor neighbor’s tree provides. I wonder what the neighbors think of me?
Stan, The Old Man
by Stan Logan | Jun 6, 2021 | Trees
This is a science lesson. So if you have no interest in science, stop reading now.
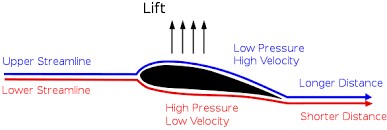
You know the saying, “You cannot keep an old dog from teaching old tricks.” I taught science for 37 years, so I cannot help thinking about scientific principles while gardening. For instance, every time I use my leaf blower to move a stubborn magnolia leaf that my neighbor’s tree has provided, I think about Bernoulli’s Principle. Good old Bernoulli discovered that the faster a fluid moves, the lower the internal pressure. The next time you fly (in an airplane) look at the wing. You will see that the upper surface is curved compare to the bottom surface. This causes the air moving over the top of the wing to travel a longer distance than air beneath it. The air on top therefore has to move faster to get the back of the wing at the same time as the air beneath it. Since the pressure on top is reduced, the greater pressure beneath will lift the wing (and hopefully you along with it).
Bernoulli’s Principle
So why, when I blow air over the top of a magnolia leaf, doesn’t it rise? Well, unfortunately I know the answer. Technically it is called “angle of attack”. (LaVille and I used to fly small planes.) The air blown at the leaf is coming down on it rather than parallel to it. I supposed if I laid the blower down on the ground so that the air flowed along it, the leaf might rise. But that would look stupid, and I get ridiculed enough as it is.
So the next time you are out blowing leaves and a leaf sticks to the ground so you have to go and kick it, yell out “Where’s Bernoulli?” . . Or the next time you are flying along in a plane, say a silent (or loud) thanks to Bernouli. He’s doing a great job of keeping you up.
Stan, The Science Man
by Stan Logan | Jun 5, 2021 | Garden tools
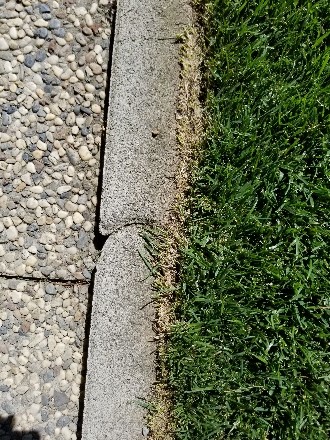
If you look at the first photo below, you can see that absolute mess I made trying to edge my otherwise beautiful lawn with a string edger. Lawn edging is something that I have never been able to do well. Well, I solved my problem. I removed the guard from the edger. Now I can actually see what I am doing, and have been able to do a good job, if I do say so myself. If you also choose to remove the trimmer guard, you must wear eye protection. I would also suggest that you floss your teeth when your edging is finished.
Stan, The Much Improved Man
Butchered lawn edging |
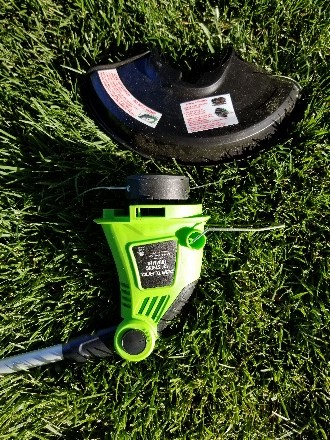 Trimmer with guard removed |
by Stan Logan | Jun 4, 2021 | Garden tools
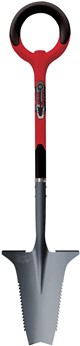
Root Slayer |
Here is another tool recommended by Anita Clevenger. The Root Slayer is a shovel with a sharp V-shaped tip and blade edges with saw teeth. It is perhaps Anita’s favorite tool because using it vastly reduces the strain on her hands and wrists. She says it’s absolutely essential for digging around trees. One of the drawbacks to this shovel is that it will slice right through irrigation lines as well as roots. Then too, the tool description says not to use it for prying action. The Root Slayer comes in 3 basic models—a straight long handle version for $47, a short heavy-duty version for $64 and a light-weight short version for $35. In Amazon’s description the light-weight shovel is suggested “for women and mature gardeners”. If you are not sure if you fit into these categories, give me a call and I’ll help you decide.
Stan, The Tool Man
P.S. A further discussion with Anita revealed that there are many models of the Root Slayer. Her model is actually the lighter version discussed above, but with a different handle than the ring handle. She feels the lighter shovel is better because it can maneuver into smaller spaces. She also indicated that this is a popular shovel with backpackers and users of metal detectors. I suspect that short 29” “Mini-Digger” or the trowel would be useful here. |
by Stan Logan | May 31, 2021 | Garden tools
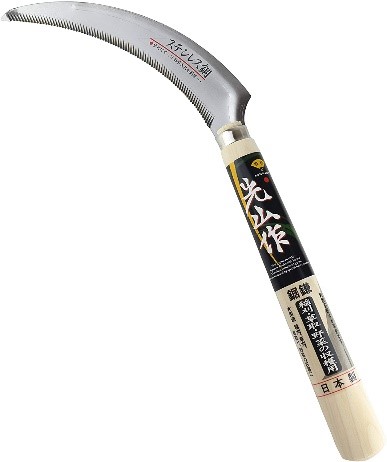
Here is a tool via Anita Clevenger. The Japanese grass sickle saw is an inexpensive tool that will really save you a great deal of time when it’s time to cut back your ornamental grasses. There are many models, but the one Anita bought at Home Depot is unique in that the inner blade is a fine-toothed edge that is extremely sharp—I mean really, really sharp. Wear a substantial glove with the hand you use to grab a bunch of grass and slice off that bunch with a careful quick pull. The one model I found on Amazon with a finely serated edge is the “Hounenkihan Japanese Grass Sickle Saw” and runs $16.99. Remember to count your fingers when you finish the job. You may have left something behind.
Stan, The Tool Man
Japanese grass sickle
