by Stan Logan | Feb 19, 2022 | Container plants, Garden tools, Propagation
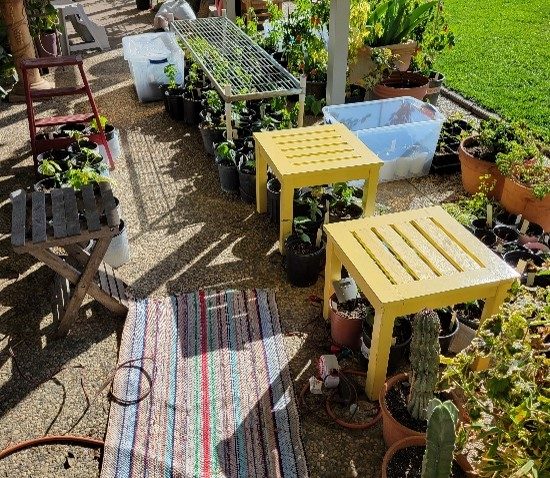
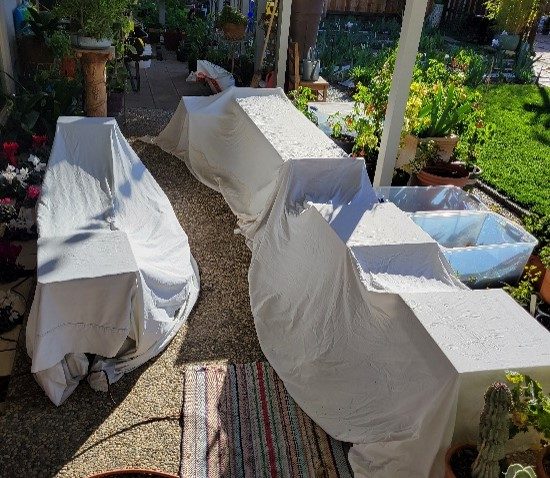
With the advent of a freeze forecasted for the 22nd, I thought it timely to remind you to protect your tender plants. Although there are special sheet-like products available, old bed sheets will work fine. Got no old sheets? Then plan on going to estate sales. They are a sure find. In the photos below I have placed old X-mas tree lights (estate sales again) beneath the sheets. These maintain a temperature above 50 degrees through the night to protect the abutilon seedlings that are growing for future sales. If you plan on using plastic sheeting, don’t let the plastic touch the plants.
I just went outside to take a photo of the plants that the sheets were protecting. The abutilons have really grown well through the winter for the last 3½ months since cutting. We lift off the yellow tables each morning. A timer controls the lights, and that rug is a deterrent from tripping over the cords. The south exposure creates an extra 10 degrees of air temperature, and the pots most exposed to the sun are wrapped with white bubble wrap.
Stan, The Propagation Systems Manager Man
by Stan Logan | Feb 19, 2022 | Propagation
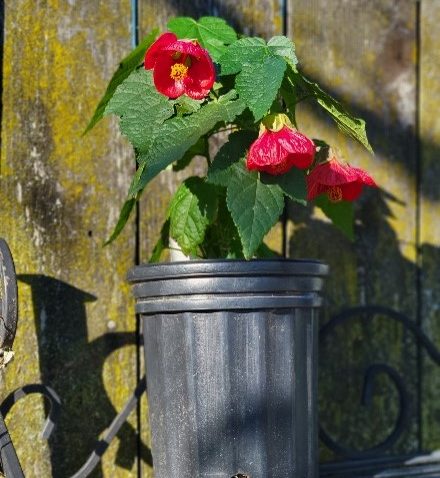
| Just look at thia photo. Can you not fall in love with a beauty like this? This abutilon is growing from a cutting obtained from a small tree growing in a friend’s back yard. This particular variety is a miniature that typically grows to about 18 inches, but in Sharon’s yard it has stretched up to four feet in search of more light. LaVille so loves abutilons that she is propagating 10 different varieties. These are practically the only outdoor plants that she is working with in preparation for club sales. Instead, she is growing many different indoor plants with an emphasis on begonias, hoyas, and peperonias since these plants are easy sellers.
Look for LaVille at the next Perennial Club sale. She is willing to share the love with you.
Stan, The Lover Man |
Abutilon |
by Guest Contributor | Jun 19, 2021 | Propagation
by LaVille Logan
If you have read Pot and Re-pot (Blog #4), you’ll realize that I use a lot of containers of different sizes. Keeping these organized and available for re-use can be a chore. I use and re-use the smallest sizes constantly. I do not sterilize between uses, but Stan retrieves the used cups from a plastic milk crate and while seated on an upturned 3 gal. bucket, washes them over the lawn and scrubs each out with a circular brush. He stacks them in the crate again. I have so many he has only had to do this twice. I use the same crate to stack the used ones, and the stacks get tall but one crate seems to be just fine. (I wonder how long it has been since milk crates have been used for hauling milk). The larger 1 and 2 gal. pots are stacked against our side fence. Since many plants are sold in the larger sizes, we need to replenish them, and many trips to the local nursery to check the recycle bin has kept our supply healthy. Go out to your storage area to see if you have something like a milk crate in which to stack smaller useful square or round pots. Taking and planting cuttings is complicated, and it helps to keep the many necessary items in some sort of order.
by Guest Contributor | Jun 18, 2021 | Propagation
by LaVille Logan
Choosing the right container for your cuttings will increase success and keeping an eye on root development is necessary. Knock the plant out of its pot to see if the roots are filling up.
- Choose a pot at least 2” to 3” larger. Any larger encourages over watering.
- Put a bit of E.B. Stone Sure Start on the new mix so roots come in contact.
- For anything but a tree, 1 gal. is a large enough pot. This keeps the digging reasonable when placing in garden.
Save your used containers. Rinse them out, use again. I have used my smallest containers over and over.
by Guest Contributor | Mar 16, 2021 | Propagation
by LaVille Logan
For most plants there is a window of opportunity for success. I always rely on asking Google for help with this as it steers me away from mistakes. “Google, when is the best time for ________ cuttings? Often the answer is “When the plant is actively growing.” This makes it unnecessary for me to be concerned with the planting zone because the plant will be growing when conditions are good for it. Plant growth stages fall into 4 categories: herbaceous softwood, semi hardwood, and hardwood and are very important in determining whether or not the cutting will root. I will be concerned with softwood cuttings today as much of my experience is with this group. I have started clematis, forsythia, fuchsia, pelargoniums, salvia, ivy, hoya, abutilons and hydrangea this last season. (Be aware that I did not take all of the cuttings at precisely the “correct” time.) Softwood is when the young stems are just getting a little hard—not likely to dry out after they are cut. Older stems become harder and it is more difficult for them to develop roots in that stage. The softwood should snap and break when bent. You can use the same starting procedures with softwood cuttings: 1. Cutting length from 4 to 6 inches, 2. Strip bottom two sets of leaves, creating a scar to ‘work with’ the hormone, 3. Dip into hormone powder, shake off extra, and 4. Place into readymade hole in dampened potting mix. Keep cutting in a humid environment for 2 to 3weeks ( refer to blog about tote containers or use inverted Zip Lock bags. It is better if the bags do not touch the cuttings. There are many plants that will work with these procedures, but the ones listed are the plants to which I had access. Regading not taking cuttings at the ‘correct’ time–remember the windstorm? A branch of our Xylosma tree broke off, I made a 20+ cuttings, (insert unhappy emoji) they all failed, but when I trimmed back my clematis later (not actively growing, and kind of crunchy) I got two of those cuttings to grow! Yay!
by Stan Logan | Mar 16, 2021 | Propagation
Years ago I bought a pack of 60 sheets of yellow sticky traps figuring that it was enough to last a life time. I now see that the stack of sheets is running low. I’m afraid that does not bode well for my future. But until we both expire, I’ll keep plodding along.
The reason for my original purchase was to do battle with the white flies that like to infest our iris beds. Being cheap, I always cut the letter size sheets vertically into thirds and then hung these narrow strips throughout the beds every year. That technique has worked fairly well as whenever we walk through the beds, we purposely knock against the plants, the white flies fly up and zip over to the yellow strips to which they become stuck.
When LaVille mentioned that several of the plants she was propagating started to get white fly, I cut sheets into thirds and then those strips in half. I then mounted them on miniblind stakes and taped the stakes to the sides of the totes in which the plants were being raised. Well this was only partially successful as the stakes stuck to the totes, but the mini pieces of sticky sheet sometimes did not want to adhere to the stakes. The yellow sticky sheet material is flat and likes to stay that way—they didn’t want to bend around the bent stakes. Adding blue masking tape worked somewhat, but I found small metal clips worked as a last resort.
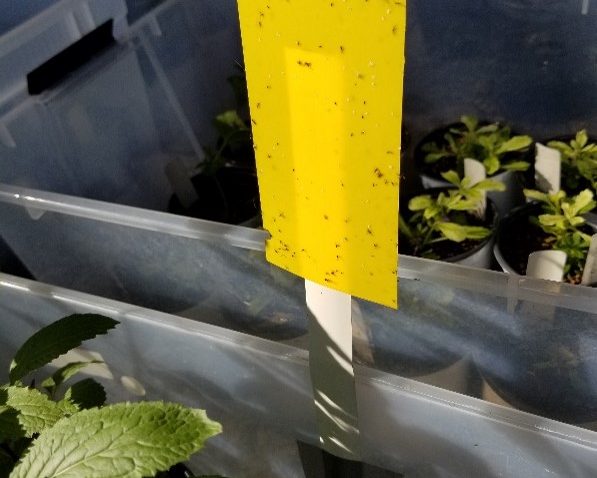
So far, pretty boring, right? Well, look at the accompanying photo. See the attached white flies? . . . No, you can’t. They are tiny, and blend right in with the yellow mini sheet. I just took a flashlight (It’s night time) and tried to count the white flies. I figure there is at least 100 on both sides of the yellow mini sheet. Look at the photo. Guess what those dark specks are? Those are fungus gnats. It’s a 2fer! After the sticky mini strips were in place for about 4 days, no flies or gnats appeared when we brushed the plants. Adults were eliminated, so the life cycle was broken.
So if you have any trouble with white flies or fungus gnats, try using these yellow sticky traps. I have to tell you though, working with these is a real pain. I mean these traps are really sticky. You can remove sticky stuff from you fingers with paint thinner.
Well, I feel foolish. I just checked Amazon and found that there are all kinds of small yellow sticky traps now available. Not only that—they actually advertise use on fungus gnats and flying aphids as well as white flies. Do I feel out of touch!
Stan, The Feeling Old Man
Capture gnats with sticky trap