by Stan Logan | Mar 17, 2021 | Garden tools
Although not really a tool, plastic coated steel garden stakes certainly can qualify as a helpful item for successful gardening. The reason I am mentioning it now, is that I have recently been made aware of a deal that I would like to pass on to you. Most gardeners have a stash of stakes of various lengths. In fact many of the estate sales I’ve attended will have stakes if there was any history of gardening at the property—that along with a collection of fertilizers, chemical treatments and most importantly—gardening tools. But who currently wants to go an estate sale where you are often crowded in a house with strangers? I haven’t been to a garage sale for a year—sob, sob. Anyway, if you find your supply of garden stakes lacking, here is a source that will satisfy your needs for good quality garden stakes at a reasonable price. You can order these on line from Home Depot with free home delivery. Note that you can order lengths from 4 feet to 7 feet.
Happy staking!
Stan, The Tool(?) Man
by Stan Logan | Mar 3, 2021 | Garden tools, Weeds
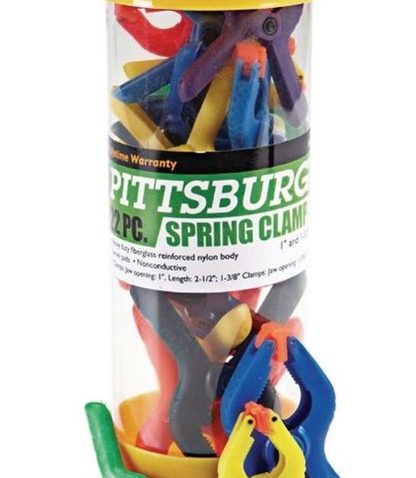
Once again it is beneficial to look outside the box. Here we have a versatile item that you won’t find in your local nursery. Please note that although labeled “Spring” clamps, these devices may be used during all 4 seasons—and especially in the Summer. You can see by the accompanying photo, that they are brightly colored, which will hopefully prevent their loss. (I haven’t seen your garden, but I suspect you may have the tendency to leave stuff all over.) This complete variety of color allows you to accessorize your gardening attire with clamps that will attach anywhere. I don’t have much capability, but I suppose you could even adorn your hair with these snazzy items. I tried this idea, but found it rather painful.
So how would you use these clamps in the garden? You could support plants. You wouldn’t pinch the plant itself—that would be cruel—but enclose the branch and clamp to a supportive structure. Using this on vines, tomato plants, and bougainvillea immediately comes to mind, but, really, any plant that requires staking would be a good candidate. Then there’s the need to attach sheet material—bird netting, shade cloth, frost protection, tarps. Could you use it to attach labels? How about hanging yellow sticky sheets. Maybe you need to close a bag of fertilizer. How ‘bout sticking one on your body to remind you to turn off the water.
I think you can see that there is almost no end to the uses for this versatile tool. You are probably not trying to decide whether or not to buy, but how many to buy. Well, the good news is that these clamps are really cheap. You can purchase a set of 22 clips for only $4.99 at your closest Harbor Freight, so don’t hold back!
Happy Clamping,
Stan, The Tool Man
P.S. If you really want to travel outside the box, google “clampers.” My brother-in-law is one of these.
Spring Clamps
by Stan Logan | Jan 18, 2021 | Garage and estate sales, Garden tools
I don’t know if you remember, but several times I have emphasized the importance buying tools that are as light as possible—as long as it doesn’t affect the quality or effectiveness of the tool. This would apply particularly to shovels and brooms. This fact was brought to mind when I recently received a birthday gift from one of my sons. This shovel arrived in a box from Lowes that was so mangled and mashed, that you wouldn’t think anything inside could have survived, but survived it did. Now, this 48 inch Cobalt steel digging shovel is really substantial—no wonder it survived. The handle is steel and the step flange is wide which is advertised to not hurt your foot (like I’m going to be out digging barefoot or in flipflops—come on!). Anyway, the point is that this shovel is heavy. Every time I heft the shovel, I am lifting the weight of the shovel as well as its load—wasted energy. This shovel is so substantial that it comes with a lifetime warrantee. If I didn’t know this son better, I would suspect that he has sights on this tool in the end, if you know what I mean. In the meantime, the shovel is awaiting a significant sharpening as the shovel blade is really thick.
Boy! When I digress, I don’t go halfway. I am trying the make the point that several tools are better when they are light. This is particularly true with leaf rakes, which you use by constantly swinging them back and forth. I am in love (not really) with a rake I found at a garage sale. It is the Blue Hawk 24 inch leaf rake. The Blue Hawk series of products are entry level tools from Lowes. The handle is made of light wood. The rake head is light plastic, and only the tines are metal. I found by accident that you can actually improve this rake. One day I was too lazy to pick up the rake from the lawn and thought I could pass over it without harm. The mower ripped off 4 of the tines on one side. (I never did find the tines.) I used this lopsided rake for many months until I came up with the idea of removing 4 tines from the other side by sawing through the plastic head. Now, through serendipity (stupidity) I have a long handled, narrow headed rake with long tines that is able to remove leaves from tight confines. Since then, I was able to buy another Blue Hawk at another garage sale, so I have a full-size rake as well. So, my suggestion to you is that, if you need a rake, go to Lowes and pick up one of these light-weight beauties for about $10. Then, if you want to improve your raking capability, buy a second one and cut off tines from each side. You can skip the mower part.
Happy raking! Stan The Tool Man
by Stan Logan | Nov 28, 2020 | Garden tools, Trees
Perhaps a dozen years ago, LaVille and I planted 12 different fruit trees. We followed the advice of the Dave Wilson Nursery and planted them in 3 groups of 4. There were 4 cherries, 4 nectarines, and a group of 3 pluots with a plum. Each group was growing on the same root stock. The planting pattern was a square with trees 2 feet apart. The goal is to have 4 stunted trees with a varied ripening sequence. Trees were pruned to keep the center of the group open and the height limited to a comfortable harvesting level. Sounds promising, right?
The nectarine trees never produced decent fruit. It may have been related to the fact that I was never able to control the peach leaf curl. So after probably 5 years, I removed them. This wasn’t too difficult, because the root systems weren’t huge.
The cherry trees were doing just fine. Sure, the jays took their toll, but we did have days of human grazing. Then the spotted wing drosophila arrived. The treatment was to apply a spray every 5 days beginning as soon as the fruit showed a blush of color. A couple years of futile effort lead to tree extermination. This was not easy as the biggest trunk was probably 8 inches across. My tools this time were a hand saw, shovel, and hatchet. I won the battle, but there were times when the desired outcome was in doubt.
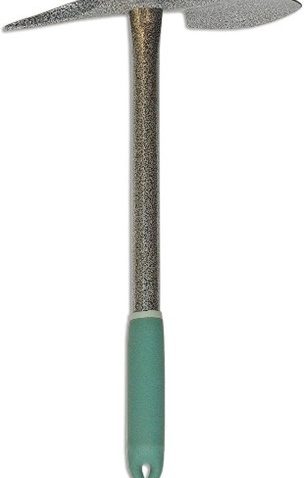
The 3 pluots and plum trees produced mixed results. The Montgomery plum was just OK. 2 of the pluots produced very little fruit. The Dapple Dandy produced an abundant crop each year. The fruit was large and had a marvelously tasty, sweet flavor. Then disaster struck. Remember that the center of the group is pruned to keep it open, so all of the fruit is produced on the outside of the grouping. Well, even after extensive fruit thinning, the Dapple Dandy had so much fruit on one side, that the trunk cracked open. That was also the straw that broke the camel’s back. All 4 trees were sentenced to termination. Being now an experience henchman, I added 2 tools to my arsenal. Most importantly was the reciprocating saw. It easily chopped off branches and shortened the trunk. It was indispensable for cutting through the roots which were large and intertwined with the roots of the other trees. Not only that, but unlike the cherry trees, these trees had a tap root which required me to excavate extensively to gain access to them. I found that a planting pick was useful for clearing soil away from roots to expose them for the saw blade. It is unavoidable to keep the saw blade away from the soil. I fortunately had bought a package of 5 9” blades, because the soil really dulled them fast. You can tell a blade needs replacing when it not only doesn’t cut, but the friction of the dull blade starts producing smoke. Even with these tools the task was difficult. I could only manage one tree per day.
In the end I did, of course, prevail. Now there is room for planting more irises, which is a good thing as LaVille has probably 30 or 40 growing in gallon pots.
Now, concerning tools, I have discussed both the transplanting shovel which I used and the reciprocating saw in previous articles. The saw is a must if you have serious tree work to do. I would recommend the little light weight planting pick if your soil is light. I have also found it useful for digging shallow trenches to bury drip lines. Most similar models are heavier and have a squared off chopping blade. The Planting Trenching Digging Garden Hand Tool from Amazon pictured below is like the one I used.
So . . . what does all of this have to do with hating trees? “Hate” is perhaps too strong a term for my attitude toward trees, but you can perhaps understand why I have a somewhat negative attitude. No one enjoys failure—least of all me.
Stan, The Tool Man
by Stan Logan | Oct 30, 2020 | Garden tools, Weeds
Do you remember that day in high school biology when you dissected a night crawler? If you don’t, let me tell you that it is an earthworm about 7 inches long. You used your scalpel to carefully cut in incision in the dorsal surface at the anterior end. Then using a probe, you scratched at the tissue of the wall segments and pulled back and pinned the body walls to the wax of the dissection tray. Further scratching with the probe finally revealed the brain which consisted of two connected tiny white lumps lying on top of the esophagus. We called this process teasing, and I am reminded of my first dissection back in 1957 whenever I am fighting the oxalis growing in my lawn. I only have a few spots where oxalis insists on returning. Several years ago. I removed 8 square feet of lawn that was hopelessly infested with this weed. I thought I had eradicated it, but 2 or 3 areas continue to be a problem.
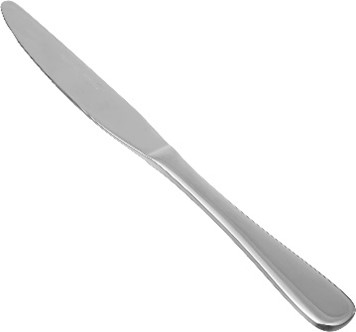
So weekly, after each mowing, I get down on my hands and knees and use a teasing technique to remove any oxalis before it has a chance to go to seed. The tool I use is a dinner plate knife because is it rigid, narrow, and had a dull rounded end. I grab the oxalis by the neck (not really the neck) and pull gently. At the same time, I tease (scratch) the soil where I figure the root is located. Generally. the root gives way and another plant bites the dust (so to speak).
I figure that I have a right to tell you about this experience because it does involve a tool, albeit a tool with very limited use. By the way, this is also the tool I use to spread peanut butter in the rat traps that I try to keep baited year-round.
I guess the one question remains—will I be able to completely tease the oxalis to death—or will it outlast me and tease me to death?
Stan, The Tool Man
P.S. My editor says the last line is a little grim.
Table knife as garden tool
by Stan Logan | Oct 5, 2020 | Garden tools
How is organic dumpster diving different from ordinary dumpster diving? Well, ordinary dumpster diving has been around for decades—ever since dumpsters have been created to store discarded items. Organic dumpster diving is a more recent activity allowed by the recent effort to keep organic materials out of the landfill. Now, searching through the contents of your organic bin may seem somewhat unpleasant, if not downright disgusting. However, sometime a dive seems imperative. Have you ever been working with a favorite tool, and after depositing plant clipping or weeds into your organic bin, that beloved tool has disappeared? After endless searches has revealed no misplaced tool, the fear slowly arises that you have thrown away your tool. This happened to me several days ago when my hand rake suddenly disappeared. So, I pulled the garden refuse out of my bin. No tool. Then I went over to my neighbor’s bin, to which I had added my excess, and pulled all the plant material out and into a garbage can. No tool. Now I must admit that most organic dumpster dives are unsuccessful. I figure the success rate is about 20%. And sure enough, I later found the hand rake lying on the back of the Prius in the driveway. I continues to amaze me how I will have absolutely no recollection of where I put something down.
So, I guess I’d have to say that organic dumpster diving is not something I think you’ll enjoy, but it is the only way that you can be assured that your treasured tool is not gone forever.
Happy diving (?)
Stan, The Tool Man
