by Stan Logan | Mar 19, 2020 | Garden tools
Knee Pads
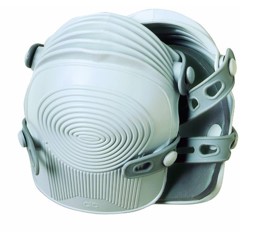
It seems unavoidable that some gardening activities are going to be done on your knees. But you really should never kneel on a hard surface without using some sort of cushioning. Kneeling pads are useful, but if you want to be efficient and look professional, get a pair of knee pads.
I have been known to look professional all day long during gardening season. I have also looked particularly professional when walking around the neighborhood with knee pads, or especially when napping in my recliner.
I have 2 pairs of knee pads—one for inside the house, and one for outside. The outside pair sometimes gets grit stuck to them and that can cause damage to hardwood floors as you move around. (You do clean the condensing coils beneath your refrigerator, don’t you?)
There are numerous knee pad styles. I prefer a style that has a foam pad inside a harder rubber outer cover. This is the style shown below. I have seen these knee pads sold at Home Depot, and they are available for $23.71 at Amazon Prime.
The main consideration in choosing knee pads is the comfort of the securing straps. Unfortunately there is no trial program for testing knee pads. I suppose you could strap on a pair and crawl down the aisle of your local big box or garden store, but I’m afraid that would not look professional. Those of you who garden in shorts may be particularly handicapped trying to find a comfortable set. Be persistent in your search. Soon you find that you too will be eating meals and napping in your knee pads.
Stan, The (professional looking) Tool Man
by Stan Logan | Mar 19, 2020 | Garden tools
Colinear Hoe
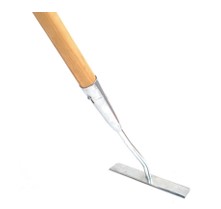
If you are using a drip system with a lot of plastic tubes spread across your garden, you know full well how difficult it is to weed around these lines. The best answer to your weeding needs is a collinear hoe. This is a long handled hoe with a rectangular blade at the end. The blade is narrow—about 1 inch and the width can vary from 7 inches to less than 4 inches. It is called collinear because the cutting edge is at the same point directly in line with the long handle. What this means is that when your blade encounters a weed and meets resistance, there is less torque or twisting force exerted on the handle. The main advantage though is that you can slip the thin blade under drip lines or soaker hoses where weeds frequently reside. Then too, since the blade is thin, there is very little disturbance of the soil. I would describe this as a hoe that you would use in more delicate situations. It is not effective in areas where you have allowed weeds to develop thick roots. If you watch the videos online demonstrating hoe use, you’ll see that they are working in rather tight areas around delicate plants like lettuce, and that the weeds are rather small.
If you google “collinear hoe”, you’ll readily find it along with videos on how to use it. You have a choice of blade width and either fixed or replaceable blade models. If you are hoeing in tight quarters, pick a narrower blade. I would opt for the fixed blade because I much rather sharpen a blade rather than order a replacement blade and pay $15. I also think that a fixed blade is easier to clean and has a smoother cutting surface.
There you have it—a weeding tool that can easily slip under drip lines and maneuver in tight planting situations. The collinear hoe costs around $40 and since it’s not on Amazon Prime, you’ll have to pay shipping as well.
Happy hoeing,
Stan, The Tool Man
by Stan Logan | Mar 19, 2020 | Garden tools
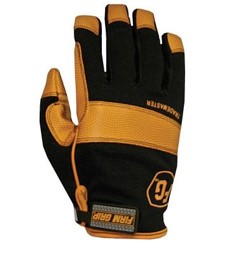
The thought of needing gloves can bring on a feeling of dread. If I need gloves, the task at hand is probably strenuous. Now, strenuous tasks were no problem when I was young. I worked my way through college working for my dad as a laborer in construction. In those days we would wear those loose gloves with a collar-like top. In my 30’s and 40’s I moved up to the heavy leather gloves that used to be sold in a 2-pack at Costco for $20. Now in my 70’s I have no use for heavy gloves. If the task is so hard that it requires heavy gloves, I’ll pay someone else to do the work. Now the gloves I wear are designed not to prevent blisters, but mainly to just keep my hands clean. Protection against slivers, pokes, and scratches is an added plus.
There is a whole slew of different gloves that will keep your hands clean and protect them from minor physical trauma. Go to the glove display at Home Depot or Lowes. There you will find an absolutely amazing variety of gloves hanging on hooks. You can try on the different designs and sizes to find out what is most comfortable. If color coordination is important to you, have at it. Make sure that you buy a pair that has a Velcro closer or a tight elastic top—there’s nothing more irritating than working with gloves containing dirt or garden debris. Try both gloves on before you buy—both must be comfortable. One of the gloves I bought recently had a pokey seam that I had to trim. Now, the gloves I wear are not waterproof, and I don’t think you’d enjoy gardening with sweaty hands inside gloves anyway. Nor will these gloves protect you from the thorns of roses, citrus, pomegranate, flowering quince, and the like. But using these thin, comfortable gloves will keep dirt out from under your fingernails and protect your skin against minor dings and abrasions. And guess what—they’re washable. Just throw them into the washer with the rest of your soiled garden work clothes and they’ll be as good as new (or at least as good that get-up you wear in the garden)
Just thinking of your hands,
Stan, The Tool Man
by Stan Logan | Mar 19, 2020 | Garden tools, Irrigation
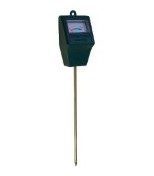
Kill any plants lately? If so, it was probably because of too little or too much water. The tool you need is the moisture meter. Now, one of the guest speakers (the “Giggling Gardener”, I believe) on the Farmer Fred radio show said that each of us has a moisture meter on each hand. But, honestly, I don’t like jamming my finger down into the soil. I hate dirt under my fingernails. Then too, sometimes even a long finger can’t get through the plant to reach the soil.
Many moisture meters come with 2 probes. I personally find the additional metering of pH and light useless. A second probe also makes it twice as hard to penetrate the soil. Moisture meters are available at garden centers and nurseries for about $10. If you can only find 2 probe models, I suggest you snip off the second probe. Are you really ever going to adjust the pH of your soil? Dip each probe separately into water to see which one detects moisture. Don’t leave the meter in soil between uses. Corrosion will reduce effectiveness. If corrosion appears, use steel wool or fine sandpaper to clean the probe.
I believe most of you have potted plants, and it is those plants that are susceptible to over or under watering. Whether it is potted irises, violets, cyclamen, ferns, or Chinese evergreens, soil moisture needs to be monitored. By the way, you do realize the proper way to water a potted plant is to apply water until it runs out the bottom. That will reduce the buildup of minerals in the soil. Another tip is to beware of drip basins. Water left in a drip basin will cause soil to remain saturated resulting in root rot because of a lack of oxygen.
Keeping potting soil moist can also result in the culture of soil or fungus gnats. These are tiny (like 1/8 in) flies that arise from the soil of indoor potted plants when watered or otherwise disturbed. The flying adults are harmless, but it is the larval stage that can do damage by eating the roots hairs of your plants. Here you can use your moisture meter to monitor soil moisture. Allow the top layer of the potting mix to dry out between watering. This will simply break the life cycle of this pest without the application of various chemical products that are available. Watering from the bottom up is another technique to keep the soil surface dry.
Moisture meters are common in nurseries and can be purchased on Amazon for less than $10. I encourage you to leave the moisture meter somewhere in the house where you will come across it frequently to remind you to check your potted plants. Believe me, you will kill fewer plants by using this simple device.
Keeping my fingers clean,
Stan, The Tool Man
by Stan Logan | Mar 19, 2020 | Garden tools
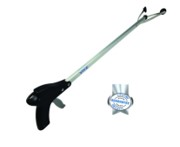
Now for a tool designed for the older set: the grabber. The grabber, as the name implies, is used to grab things. These tools would occasionally appear at garage sales. Having none, and being The Tool Man, I started collecting several. These grabbers were of different designs, most of which demonstrated why they ended up in garage sales.
The first purpose I found for the grabber was to enable me to pick up things while recovering from hernia surgeries. This was especially needed to pick up the morning newspaper. Later I used the grabber to retrieve the newspaper from beneath our car in the driveway. It’s most common use is to pick up tangerines that are dropping daily. The ability to reach around trees without stepping around so much reduces the amount of soil compaction. Speaking of picking up dropped fruit—have you ever tried to pick up a rotten plum and found that your fingers penetrated the skin so all you end up with is goo all over? This is where a grabber with suction cup ends comes in handy. It’s surprising how the suction cups will enclose the softest of fruit so it can be gently lifted to a waste container. That is why I am recommending this type of grabber. I always thought this suction cup style looked cheap and toy-like, but the suction cups are substantial and versatile in picking up a variety of objects.
Not convinced you need this tool? Do you have a magnolia tree in your neighborhood that sends indestructible leaves into your front yard whenever the wind blows? How about a pine tree that drops cones throughout the year? Got snails? Did your golf ball happen to find the depths of a dastardly water hazard? Ever prune your roses and lose a severed branch down into the plant? How do you pick up a maggot infested carcass in your yard that you discovered a little too late? Did you ever want to tidy up an ornamental bush that had dead leaves or blossoms trapped inside? Do you have grandkids that think it’s fun to use a device to pick up a bedroom strewn with toys and discarded clothes? Ever had a need to retrieve objects from behind or beneath furniture? Do dogs take a dump in your front yard and you find the desiccated remains days later? Have an old-style light bulb in the ceiling that needs changing? (Maybe you should have 2 grabbers—one for inside and one for outside.)
All right, if you still are spry enough to get down on your hands and knees, you may not be ready for this tool. But if you’re like I am, and you don’t mind looking like that old guy down the street who used a grabber to pick up magnolia leaves off his lawn each day, then swallow your pride and buy a grabber. There are many available on line. The one shown is the VIVE Suction Cup Reacher Grabber – 32” Long Heavy Duty Mobility Aid for $19 with Amazon Prime.
Remember, don’t get old and crabby—just be grabby.
Stan, The Tool Man
Grabber
by Stan Logan | Mar 19, 2020 | Garden tools
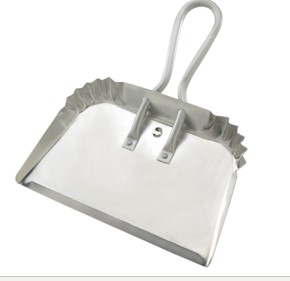
Getting rid of the leaves that are dropped from deciduous trees in the Fall can be an arduous task. You can use a leaf blower and rakes of various types to form piles. Transporting these piles to a compost bin or to the street for city pick up is generally fairly easy by using a wheelbarrow, utility cart, or simply a plastic garbage can. How do you get the leaves from pile to hauling container? Many of you probably use a pitch fork or snow shovel and these are fine if you have a large task. But for most of you, I have a better choice. This is a dust pan—a large dust pan. This 14” wide pan has a looped handle that gives you good leverage. Don’t buy a 16” heavy metal pan–it’s simply unnecessarily heavy and too large. Use this aluminum pan in conjunction with your rake. Slide your pan under the leaf pile with one hand. Position your rake handle in the crook of your neck and slide your other hand down the handle to the place where the rake tines attach. Raise the handle of the pan and pull the pan and rake together to trap a huge mass of leaves. Then lift the trapped debris to your transport container. When you move from leaf pile to leaf pile, simply toss the pan into your transport container, which is much easier than carrying a large tool like a shovel or fork.
There you have it—a small, light weight tool that makes garden clean up much easier. It can even be left out in the weather since it’s made of aluminum. The Quickie-Professional Metal Handheld Dustpan can be purchased at Lowes for $11.97. This tool would be the perfect Xmas gift, or I suppose you can save this surprise for a future birthday or anniversary gift. You could even write a romantic message in the pan so that your loved one would think of you whenever he or she cleans up the yard trash.
Have fun in the garden,
Stan, The Tool Man
dustpan
