by Stan Logan | Mar 19, 2020 | Garden tools
I was thinking about you again. This time I was walking around my neighborhood using a backpack leaf blower to clear the driveways and sidewalks of debris. Practically every Monday late afternoon, I blow the neighborhood in preparation for the street sweeper who comes around at 7:30am on Wednesday. I used to do the sidewalks a quarter mile down Mace Blvd. also, but when someone complained one day of the dust storm I was creating, it sort of took all the fun out of it. Then, too, my knees just aren’t what they used to be.
Anyway, the idea of doing an article on leaf blowers arrived in late January when there were still a lot of deciduous leaves to gather up. So it was too late to advise you on leaf blowers when they were actually needed. But then, timing has never been my strong suit. When the March edition of The Family Handyman discussing garden tools arrived, I just had no choice but to pen an article.
You first have 3 choices: cordless, corded, or gas powered.
If you are able to blow your yard in 15 minutes, you might want a battery powered blower. If a manufacturer claims a user life of one hour, that may be true only if the machine is used at the lower power. Compare the specs in wind speed in mph and the air voume moved in cubic feet per minute. Handle the blower with the battery attached for weight and balance comparison.
A larger yard might use a corded model. These have lots of power. Once again handle the tool. If your yard has fences, you will find it convenient to hold the blower up vertically to blow leaves away from the fence. So weight is a big consideration. If your yard is complicated, dragging cord behind you may be a real inconvenience. An electrical cord can do a real job on those plant labels other than simple cut mini blinds. If you need to buy a cord, get one that is long enough and light duty. Don’t worry about having a vacuum adaptor—I have had no luck with this action.
Gas powered models can either be hand held or in a backpack form. These are really convenient to use. Hand held models weigh about 9 lbs. Gas powered blowers tend to be noisy, so hearing protection is a must. You will need a separate gas tank in which to mix 2-stroke oil with you gas. If use is infrequent, use a gasoline stabilizer. Some communities have restrictions on gas leaf blowers, so check before you purchase. (Davis has threatened to eliminate them entirely.)
There are other uses for a blower than simply moving leaves. Cleaning roof gutters is one great use. A leaf blower works wonderfully for blowing water off yard furniture after pressure washing. We have an intricate metal sculpture that I haul outside, spray, and then blow dry with a leaf blower. Need a fast car interior clean up? Open all the doors and blow all the trash out the other side. Cobwebs on the outside of your house—not for long!
There you have it. That’s the best advice I can offer. If you take the plunge and become a blow person (p.c for blow man), let me know about your thrill of having all that wind power at your finger tips.
Stan The Tool Man (aka Stan The Blow Man)
P.S. As of 2019 I no longer blow leaves from neighbors driveways into the street. That is now illegal in Davis unless you are forming piles—and that has to be done within a week of street pickup, which has become far less frequent. Just as well—my backpack blower died. Knees are good though.
by Stan Logan | Mar 19, 2020 | Garden tools
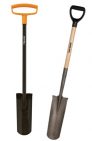
As Farmer Fred has always said, “Fall is for planting.” In my opinion there is no better tool for planting than a transplanting shovel. This is a short 4 foot long shovel with a long narrow blade. This shovel is particularly useful is digging holes for transplanting plants from 1 gallon pots. The curved blade allows you to dig a hole that is in the shape of the root ball. Also, it is easier to to penetrate the soil with a narrow blade. The D-handle gives you good leverage that prevents the handle from twisting in your hands and allows you to be more accurate if you are jabbing into the soil. This shovel also is handy for scraping shallow trenches. The rounded spade naturallly created a U-shaped trench. This stout tool can also be used as a prying tool if rocks need to be displaced. If roots are encoutered, you can use a stabbing motion as a substutute for an axe. However, you might consider letting me sharpen that shovel first.
So if you have a slew of potted plants to get into the ground, you may wish to invest in this tool. It is not an all-purpose shovel, but if this Fall is your season for planting, this is a must-have tool.
Here were 2 models available on Amazon Prime as of this writing: the Fiskers Steel D-Handle Transplanting Spade (9654) ($20.99) and the Ames True Temper 163033600 D-Handle Shovel, ($18.89)
transplanting shovel
by Stan Logan | Mar 19, 2020 | Garden pests, Garden tools
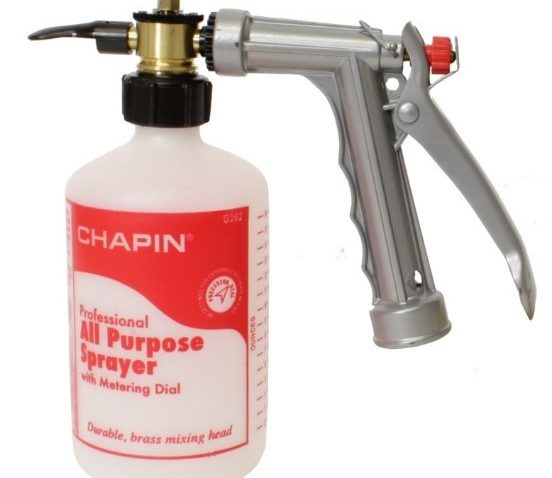
No Waste Sprayer
A couple years ago I was alarmed by the discovery of a population of carterpillars that were gorging on our redbud tree. These red humped caterpillars love redbud trees and walnut trees. There were hundreds of these little buggers completely devouring the leaves on dozens of branches. When simply spraying with a fire hose type nozzle didn’t get them all, we resorted to an environmentally friendly chemical treatment.
The sprayer I used is the tool of the month. The Gillmour No Pre-Mix Sprayer is a hose end sprayer. Rather than mixing a chemical in a spray can and lugging it around, you simply add the concentrate to the spray bottle. On top of the sprayer is a metering dial that allows you to set application rate from 1 teaspoon per gallon to 10 tablespoons per gallon. When you are finished, you save what remains and pour it back into the original container. The sprayer also has a removeable nozzle attachment that can deflect the spray in different directions.
You obviously would only use this device if you needed to treat a large area, and, of course, an area that is reachable by a hose.
If interested, you may purchases the Gilmour Pre-Mix Sprayer on Amazon Prime for $80. Better yet, how about an identical Chapin G362 Professional All Purpose Sprayer for $20?
Hoping you don’t need this tool,
Stan, The Tool Man
by Stan Logan | Mar 19, 2020 | Irrigation
Now here’s a system that you may wish to consider. I’ve used rain barrels for almost 40 years—not because I was trying to conserve water—but because Davis city water was so terrible. It was so bad that the City was forced to obtain Sacramento River water. You might have heard that Davis, UCD, and Woodland allocated millions of dollars on a river water project. Our well water was so bad that even if not affected by users, the “clean” water could not be returned to the River. It didn’t meet new environmental standards.
Gardeners depended on the winter rains to push those toxic minerals down through the soil. But if you had a planting area beneath eaves, or you had indoor plants, you had a problem. So we used rain rain water from barrels for a long time to flush this soil.
Lately though, I’ve been using rain barrels to divert water run-off from the roof from areas I don’t want water to areas that I do want extra water—specifically to the drip line of a huge hackberry tree, pine tree, and several citrus trees. If a water diversion plan appeals to you, here is what you might consider doing:
- Remove a down spout. Cut off 18” from the top of the removed section. Slip that short section back into place.
- Purchase a thin 8 foot plastic down spout extender. I bought mine at Ace Hardware. They are available at Amazon Prime for about $7.
- Attach the end of the flexible tube not containing holes to the 18” section.
- Cut another 18” off of the original removed downspout. Attach this piece to the end of the flexible tube that is hanging down. The piece of downspout that you just attached will simply serve as a weight to keep the plastic tube in whatever barrel or container you place it. You may wish to cut off a section of the plastic tube. My downspout extender does not reach the ground. Don’t worry about the little holes punched in the side of the plastic tube—water loss will be minimal.
- Now you have a down spout extender that can be moved from barrel to barrel or to a wheelbarrow—whatever
Now if you want to get fancy:
- Drill a hole in the bottom of the side of your barrel or garbage can and buy a PVC fitting that create an attachment for a hose. Now you can lead the rain water where ever you want. By adding a section of tubing like old soaker hose with holes drilled in it, you can disperse the water along a planting bed protected by an eave, or where trees need to be deep watered.
- Not fancy, but plug the other down spouts that are on that same gutter (a rolled up sock works well). Make sure that your gutter can bear the weight of being full.
- Have some kind of cover for your containers. We use an extra large size leaf bag.
Realize that your water containers are going to remain in place for a long time. Elevation is also a consideration. Gravity feed will not lead water to higher levels of your landscape, but a sump pump would.
Well, that’s the system I’ve used. You might consider creating your own system not soley just to conserve water, but to transfer rain water from where you don’t want it to where you do want it.
If you are still interested, google “rain barrels” and you will find a tremendous variety of productrs that are available.
Stan, The Tool (or Device) Man
by Stan Logan | Mar 19, 2020 | Garden tools
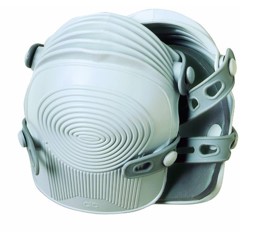
Knee Pads
It seems unavoidable that some gardening activities are going to be done on your knees. But you really should never kneel on a hard surface without using some sort of cushioning. Kneeling pads are useful, but if you want to be efficient and look professional, get a pair of knee pads.
I have been known to look professional all day long during gardening season. I have also looked particularly professional when walking around the neighborhood with knee pads, or especially when napping in my recliner.
I have 2 pairs of knee pads—one for inside the house, and one for outside. The outside pair sometimes gets grit stuck to them and that can cause damage to hardwood floors as you move around. (You do clean the condensing coils beneath your refrigerator, don’t you?)
There are numerous knee pad styles. I prefer a style that has a foam pad inside a harder rubber outer cover. This is the style shown below. I have seen these knee pads sold at Home Depot, and they are available for $23.71 at Amazon Prime.
The main consideration in choosing knee pads is the comfort of the securing straps. Unfortunately there is no trial program for testing knee pads. I suppose you could strap on a pair and crawl down the aisle of your local big box or garden store, but I’m afraid that would not look professional. Those of you who garden in shorts may be particularly handicapped trying to find a comfortable set. Be persistent in your search. Soon you find that you too will be eating meals and napping in your knee pads.
Stan, The (professional looking) Tool Man
