by Stan Logan | Jun 30, 2021 | Fertilizer, Garden tools
I know you may not be willing to admit it, but I know there is a chance that you have Jobe’s fertilizer spikes. I can understand your reluctance to fess up considering the presentations that have been given by the perennial club. In June you heard a program on composting in which the use of chemical fertilizers was discouraged. Not too long ago, Pam Bone told you the uselessness of driving fertilizer spikes around trees because so little area of the root zone was affected. So, what are you doing to do with these things other than let the box continue to collect dust amongst your garden supplies? Well, let me tell you:
First of all, do you have the spikes for “beautiful evergreens” (16-4-4) or for “lush fruit & nut trees” (10-15-15)? This obviously will determine where fertilizer will be applied.
Second, do you have a hammer? If so, this is what you should do. Lay out a spike on a hard surface and beat it with the hammer. Your sidewalk out front may be a good place. You may gather a curious crowd of neighbors, who will immediately scurry off to seek out their own dusty box of fertilizer spikes. Now, you will find that bits and pieces of fertilizer will fly about and wearing googles is advised. It adds interest to the spectacle too.
Finally, apply the broken-up fertilizer bit to your plants. Now, here’s what I do with our citrus trees. I break the spikes into 4 pieces. I gather them into a bucket and walk amongst the trees and toss the chunks around the drip line of the trees so that whole ground area is evenly covered. I then take my hammer and bash them down into the soil. I time the application so that the soil is moist and soft, but not so moist that walking about compresses the soil. There is a pretty good layer of bark covering the ground, but I just smack the chucks down through it. I have to admit that I find this procedure rather enjoyable.
If you are applying the fertilizer to plants around your yard or potted plants, you will want to break up the spikes into much smaller pieces as I have shown in the photo. I used the chisel, but that isn’t necessary. LaVille has found it to be affective to shove small chunks down the sides of pots. You will have to decide how small the chunks should be and how much to apply, but then that’s the challenge, right?
So, what are you going to do with the mess of powdered fertilizer dust left on your sidewalk? Sweep it up and scatter it around your garden. On second thought, perhaps your front sidewalk is not the ideal hammering area as you wouldn’t want any fertilizer to end up in the gutter and on to our rivers and streams. You should probably do your spike bashing in the back yard. That way no one will think you are too cheap to buy a proper fertilizer.
But Stan, you say, why did you buy fertilizer spikes? Estate sales—I cannot resist a bargain. You would be surprised to see how many estate sales have dusty old boxes of unopened fertilizer spikes. Don’t let that happen at your estate sale.
Stan, The Hammer Man
by Stan Logan | Jun 26, 2021 | Garden tools, Weeds
Somehow it is ironic—instead of me describing a tool that I feel you need, but don’t have, here is a tool that you do have, but probably don’t need. Unless you have steadfastly held onto the eating habits of your Neanderthal ancestors, I’m betting that you have at least one set of eating utensils in your home. It is the dinner knife that I am singling out this time. I have found that this is the best tool for teasing out weeds from ground cover. Now, if you don’t have ground cover, stop reading and go out to your garden and do something useful—take a flashlight if it is dark.
Since you are still reading, you must have ground cover . . or are just too pooped to crawl out to the garden again. Now the term “teasing” is a biological dissection term for the act of carefully separating the organs of small specimens with pointed tools like probes or dissecting needles. Every time I use a dinner knife to tease a weed out of desired ground cover plants, I cannot help but be reminded of my first biology dissection where I cut through the dorsal surface of a preserved earthworm and teased through the connective tissue until I found the two lobed brain and the nerve cords that led down and around the pharynx. Hmmm . . . you don’t have those same memories
Back to the garden: The way you use your knife to tease is to grab the offending weed and pull gently while you work the knife down into the root area and move it about. If you are successful, the weeds will be extracted and the ground cover will remain intact. If you are unsuccessful, the stem of the weed will break off only to regrow when you aren’t looking. Now I will be the first to admit that this is not a pleasant gardening chore. You are on you hands and knees with you nose to the ground (not literally). Even using knee pads does not appease my knees which insist on complaining for hours afterwards.
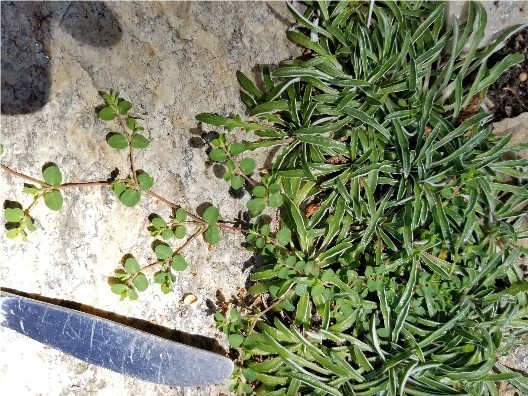
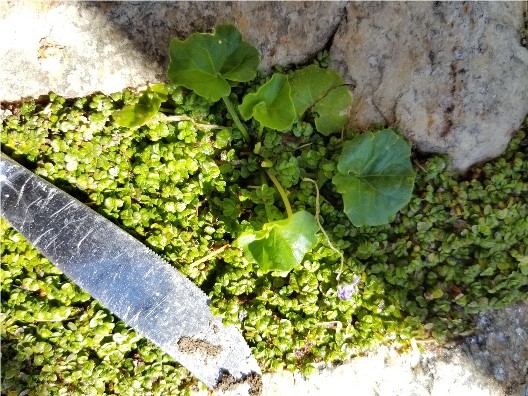
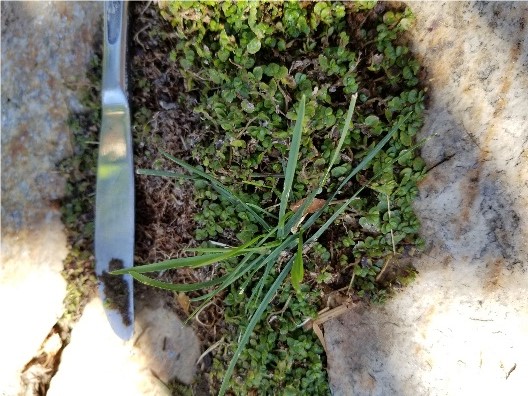
I have included 3 examples of weeding that recently required teasing in my garden. I always refer to the ground cover plants as conspiring plants as they seem to delight in hiding offensive weeds until they grow into maturity.
You know, if using grandma’s sterling dinner knife seems disrespectful, drop by a thrift store and pick up a strong stainless steel model, but watch out for impulse buying!
Stan, The Tool Man
|
 |
 |
| Spurge in Dimondia |
Australian violets in baby tears |
Grass in baby tears |
by Stan Logan | Jun 20, 2021 | Butterflies
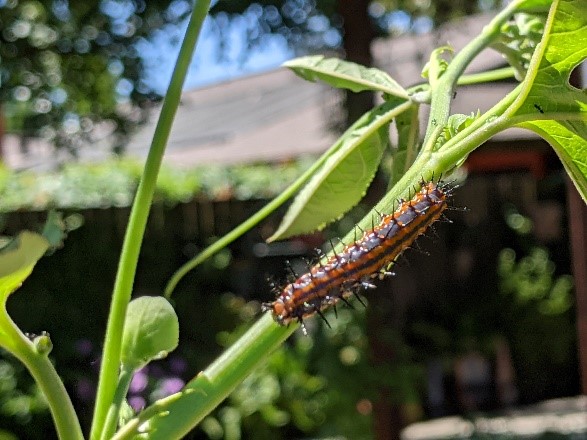
Today (June 16) my wife is thrilled. Caterpillars are eating her passion vines. Not only that—the adults are doing a little dance to spread their pheromones. Soon there will be Gulf Fritillaries all over the back yard. If you are interested in attracting butterflies to your yard, your best chance is to grow either Passiflora caerulea or Passiflora edulis in your garden. Many other passion vines are not attractive to this butterfly, especially those with red flowers.
LaVille will not have vines available at the upcoming Fall sale, but if you are eager, you can come over to the house and she can give you cuttings to give you a head start on next Spring’s growth. I suggest you come early while there is still plant material left over from voracious larval munching (just kidding).
Stan, The Happy Husband
Caterpillar on Passion Vine
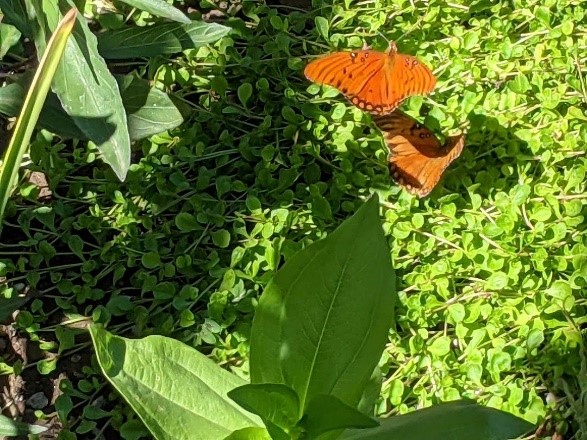
Gulf Fritillaries
by Stan Logan | Jun 17, 2021 | Irrigation
I have been trying to be able to write a comprehensive article about drip systems. I began with a list of a half dozen mistakes that I have made. I then thought I could add to my list of suggestions by viewing a few YouTube videos. Well, this went on for hours. I ended up with 2 full pages of notes. It was then that I realized that there is too much information to put into a single article. No one is going to read an article pages long. So, instead, if you are truly interested in creating a drip system, you need to do your own research. The best single YouTube program I found can be reached by googling “YouTube Drip System Watters Garden Center”. Now there are 3 videos—view the 2015 version. This is a program put on by the owner of a nursery in Prescott, AZ. He will give you a lot of practical information. If you are not yet saturated with him, simply Google “YouTube Drip Irrigation” and check out more videos.
Now I will try to add ideas that you may have missed:
If you have distance separated plants, for instance potted plants, then using drip emitters is wise. If you have plants densely planted or areas of ground cover, then using mini sprayers would be better. You cannot use drippers and sprayers on the same system. If you choose sprayers, you need to see me before buying items. I will get you started right.
Whatever system you use, try to buy parts made by the same company so they are compatible. Rain Bird seems to be the most common drip system brand. I just checked out at Home Depot, and that seemed to be just about all they carried—which was a lot! I particularly suggest buying the Rain Bird ½” couplers because they will handle all the various brands of “half inch” delivering tubing that will vary a lot in size. But order your ¼ inch delivery tubing from Amazon: “MIXC ¼ inch Blank Distribution Tubing Drip Irrigation Hose”. This is superior product. Attach the ¼ tubing to the barbed coupling first before insertion and grab the coupling with pliers to give you more leverage when forcing the coupling into the ½ inch delivery tube.
I’m going to assume that you are going to hook to a hose bib. If that bib is attached to your house, make sure it’s not delivering softened water—not a good thing. If you are buying connectors that are threaded, remember that pipe thread and hose thread are different.
If you have plantings that are lined up like in a vegetable garden, your best bet would be the tubing that contains inline pressure compensating emitters. Limit ¼ inch line runs to 25 feet. ½ inch lines can go hundreds of feet. I recommend these inline emitters over rubber soaker hose or T-tape. Run your inline system first before planting so you can see where the moist soil will be.
You barely need to cover delivery tubing if you choose to. Sun exposed tubing will last for 10 to 15 years. Then too, covered tubing won’t be tripped over. Leave the ends of lines exposed or at least located so they can be found and opened for flushing once a year. Also, flush out a line before using it the first time.
You can make staples to hold down tubing out of wire coat hangers. I can do this for you.
You will have to have different systems for trees and shrubs vs. flowering plants. One system is for infrequent deep watering and the other is for more frequent short watering.
Set your timer to water very early in the morning, but occasionally run the system briefly while you are out there to detect problems.
Plan on expanding your system as you do more planting and as plants get bigger and need more emitters surrounding them.
Don’t forget to buy a backflow preventer, timer, filter, pressure regulator and a Y splitter with valves so you can still attach a hose at the hose bib.
Good luck! Stan (You may simply call me Dr. Drip.)
by Stan Logan | Jun 8, 2021 | Garden pests, Garden tools
I’ll bet you do have nuts! As I look across the kitchen from where I am writing, I see a big jar of Planters peanuts and next to it is another big jar of Kirkland’s Marcona Almonds. (These are SO GOOD! but the store supply is seasonal, so you need to buy many jars when they are in.) Right next to the jars is the frig where we keep the walnuts. (I don’t know why.) Just checked the pantry and found an unopened bag of Blue Diamond lightly salted almonds. Anyway, we definitely got nuts, and I bet you do too.
Now, how about rats? Do you have rats? We have rats because we have citrus trees. Unfortunately we park our cars in the driveway nearby and rats love to make a nest in the engine compartment. Those little b*#&+%s (I’ve never sworn in a blog before—can you tell?) ate wiring in our Yukon. That was expensive. They also did a job on our air conditioning condenser on the other side of the house. Not cheap either. Anyway . . . we know rats. We have also killed a lot of rats, and one of the problems is disposing of the carcass. If you just put it in the garbage, it will probably stink up that whole side of the house even when you bag it. We have had to resort to double Ziploc bagging the varmint and putting it in the freezer until garbage day. The problem is that we often forget it, and when we discover it several weeks later when looking for dinner, it’s rather disturbing.
Now, how about tomatoes? Since you are a gardener in the Sacramento Valley, I know you have tomato plants—It’s the law. Don’t you just hate it when a rat gets into your tomato plant and takes just one bite out of your best tomatoes? (Insert you own swear word here: ____________.
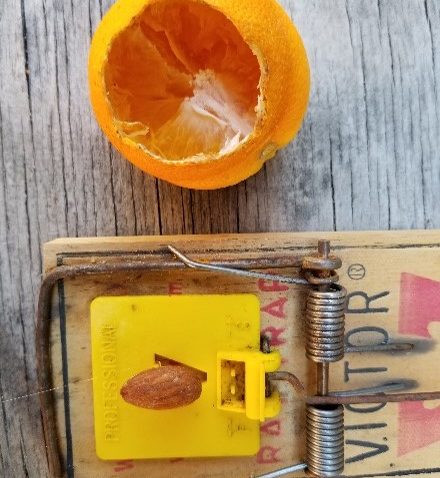
Now that we have determined you have nuts, rats, and tomatoes, let’s get ready to kill those suckers. (Is that swearing?) You have baited your rat traps with peanut butter before, and that works well, but I am always disappointed when the ants get to the bait first, leaving me with a very clean, empty trap. Here is what you need to do. Take one of your nuts—preferably an almond—and hot glue it to the trip pedal. Do this before you set the trap, or you will end up with hot glue everywhere! Now you have a trap that can be used over and over.
I’ll leave trap placement up to you. One of my favorites is to secure it to the limb of a citrus tree with green tape or a zip tie. Somehow it is more satisfying to find a rat hanging suspended from a trap. I have also found it advantageous to drill a hole in the corner of the trap and attach a cord when positioning a trap on a fence or on a ledge.
I know you hate to give up a nut, but it’s only one. I was going to use a marcona almond, but couldn’t bear to lose one, and opened the Blue Diamond bag instead.
Rat trap baited with almond
Happy trapping, Stan, The Nut Man
P.S. I just ordered an ultrasonic rodent repellant deterrent device from Amazon that will attach to my new car’s battery. I figure $24 is cheap insurance preventing over $1000 worth of damage.
