by Stan Logan | Jun 30, 2021 | Fertilizer, Garden tools
I know you may not be willing to admit it, but I know there is a chance that you have Jobe’s fertilizer spikes. I can understand your reluctance to fess up considering the presentations that have been given by the perennial club. In June you heard a program on composting in which the use of chemical fertilizers was discouraged. Not too long ago, Pam Bone told you the uselessness of driving fertilizer spikes around trees because so little area of the root zone was affected. So, what are you doing to do with these things other than let the box continue to collect dust amongst your garden supplies? Well, let me tell you:
First of all, do you have the spikes for “beautiful evergreens” (16-4-4) or for “lush fruit & nut trees” (10-15-15)? This obviously will determine where fertilizer will be applied.
Second, do you have a hammer? If so, this is what you should do. Lay out a spike on a hard surface and beat it with the hammer. Your sidewalk out front may be a good place. You may gather a curious crowd of neighbors, who will immediately scurry off to seek out their own dusty box of fertilizer spikes. Now, you will find that bits and pieces of fertilizer will fly about and wearing googles is advised. It adds interest to the spectacle too.
Finally, apply the broken-up fertilizer bit to your plants. Now, here’s what I do with our citrus trees. I break the spikes into 4 pieces. I gather them into a bucket and walk amongst the trees and toss the chunks around the drip line of the trees so that whole ground area is evenly covered. I then take my hammer and bash them down into the soil. I time the application so that the soil is moist and soft, but not so moist that walking about compresses the soil. There is a pretty good layer of bark covering the ground, but I just smack the chucks down through it. I have to admit that I find this procedure rather enjoyable.
If you are applying the fertilizer to plants around your yard or potted plants, you will want to break up the spikes into much smaller pieces as I have shown in the photo. I used the chisel, but that isn’t necessary. LaVille has found it to be affective to shove small chunks down the sides of pots. You will have to decide how small the chunks should be and how much to apply, but then that’s the challenge, right?
So, what are you going to do with the mess of powdered fertilizer dust left on your sidewalk? Sweep it up and scatter it around your garden. On second thought, perhaps your front sidewalk is not the ideal hammering area as you wouldn’t want any fertilizer to end up in the gutter and on to our rivers and streams. You should probably do your spike bashing in the back yard. That way no one will think you are too cheap to buy a proper fertilizer.
But Stan, you say, why did you buy fertilizer spikes? Estate sales—I cannot resist a bargain. You would be surprised to see how many estate sales have dusty old boxes of unopened fertilizer spikes. Don’t let that happen at your estate sale.
Stan, The Hammer Man
by Stan Logan | Jun 26, 2021 | Garden tools, Weeds
Somehow it is ironic—instead of me describing a tool that I feel you need, but don’t have, here is a tool that you do have, but probably don’t need. Unless you have steadfastly held onto the eating habits of your Neanderthal ancestors, I’m betting that you have at least one set of eating utensils in your home. It is the dinner knife that I am singling out this time. I have found that this is the best tool for teasing out weeds from ground cover. Now, if you don’t have ground cover, stop reading and go out to your garden and do something useful—take a flashlight if it is dark.
Since you are still reading, you must have ground cover . . or are just too pooped to crawl out to the garden again. Now the term “teasing” is a biological dissection term for the act of carefully separating the organs of small specimens with pointed tools like probes or dissecting needles. Every time I use a dinner knife to tease a weed out of desired ground cover plants, I cannot help but be reminded of my first biology dissection where I cut through the dorsal surface of a preserved earthworm and teased through the connective tissue until I found the two lobed brain and the nerve cords that led down and around the pharynx. Hmmm . . . you don’t have those same memories
Back to the garden: The way you use your knife to tease is to grab the offending weed and pull gently while you work the knife down into the root area and move it about. If you are successful, the weeds will be extracted and the ground cover will remain intact. If you are unsuccessful, the stem of the weed will break off only to regrow when you aren’t looking. Now I will be the first to admit that this is not a pleasant gardening chore. You are on you hands and knees with you nose to the ground (not literally). Even using knee pads does not appease my knees which insist on complaining for hours afterwards.
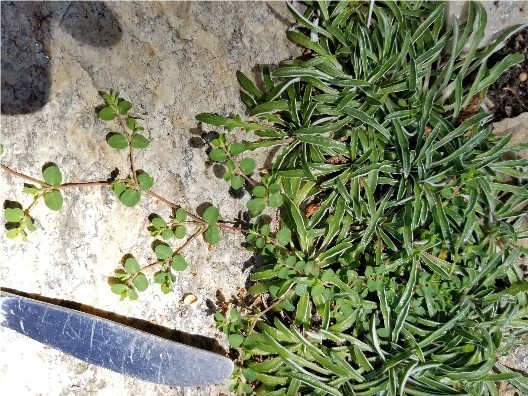
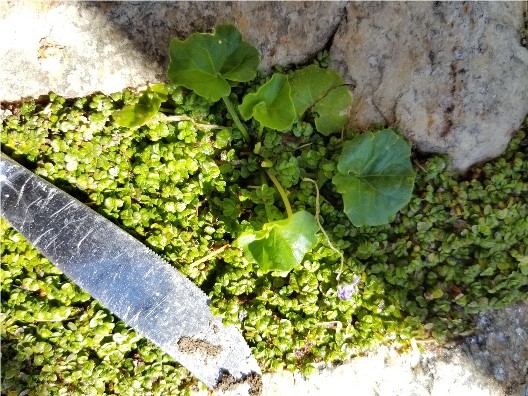
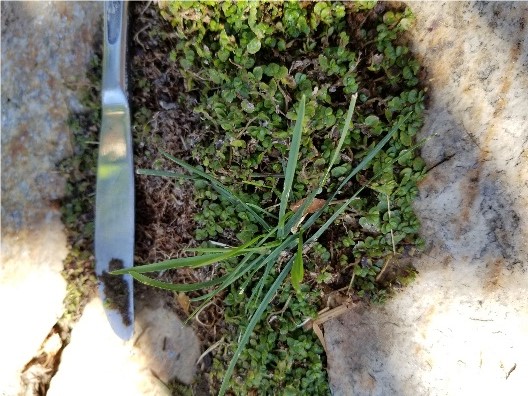
I have included 3 examples of weeding that recently required teasing in my garden. I always refer to the ground cover plants as conspiring plants as they seem to delight in hiding offensive weeds until they grow into maturity.
You know, if using grandma’s sterling dinner knife seems disrespectful, drop by a thrift store and pick up a strong stainless steel model, but watch out for impulse buying!
Stan, The Tool Man
|
 |
 |
| Spurge in Dimondia |
Australian violets in baby tears |
Grass in baby tears |
by Stan Logan | Jun 8, 2021 | Garden pests, Garden tools
I’ll bet you do have nuts! As I look across the kitchen from where I am writing, I see a big jar of Planters peanuts and next to it is another big jar of Kirkland’s Marcona Almonds. (These are SO GOOD! but the store supply is seasonal, so you need to buy many jars when they are in.) Right next to the jars is the frig where we keep the walnuts. (I don’t know why.) Just checked the pantry and found an unopened bag of Blue Diamond lightly salted almonds. Anyway, we definitely got nuts, and I bet you do too.
Now, how about rats? Do you have rats? We have rats because we have citrus trees. Unfortunately we park our cars in the driveway nearby and rats love to make a nest in the engine compartment. Those little b*#&+%s (I’ve never sworn in a blog before—can you tell?) ate wiring in our Yukon. That was expensive. They also did a job on our air conditioning condenser on the other side of the house. Not cheap either. Anyway . . . we know rats. We have also killed a lot of rats, and one of the problems is disposing of the carcass. If you just put it in the garbage, it will probably stink up that whole side of the house even when you bag it. We have had to resort to double Ziploc bagging the varmint and putting it in the freezer until garbage day. The problem is that we often forget it, and when we discover it several weeks later when looking for dinner, it’s rather disturbing.
Now, how about tomatoes? Since you are a gardener in the Sacramento Valley, I know you have tomato plants—It’s the law. Don’t you just hate it when a rat gets into your tomato plant and takes just one bite out of your best tomatoes? (Insert you own swear word here: ____________.
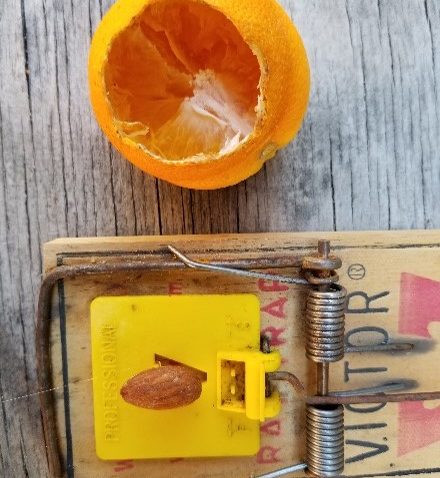
Now that we have determined you have nuts, rats, and tomatoes, let’s get ready to kill those suckers. (Is that swearing?) You have baited your rat traps with peanut butter before, and that works well, but I am always disappointed when the ants get to the bait first, leaving me with a very clean, empty trap. Here is what you need to do. Take one of your nuts—preferably an almond—and hot glue it to the trip pedal. Do this before you set the trap, or you will end up with hot glue everywhere! Now you have a trap that can be used over and over.
I’ll leave trap placement up to you. One of my favorites is to secure it to the limb of a citrus tree with green tape or a zip tie. Somehow it is more satisfying to find a rat hanging suspended from a trap. I have also found it advantageous to drill a hole in the corner of the trap and attach a cord when positioning a trap on a fence or on a ledge.
I know you hate to give up a nut, but it’s only one. I was going to use a marcona almond, but couldn’t bear to lose one, and opened the Blue Diamond bag instead.
Rat trap baited with almond
Happy trapping, Stan, The Nut Man
P.S. I just ordered an ultrasonic rodent repellant deterrent device from Amazon that will attach to my new car’s battery. I figure $24 is cheap insurance preventing over $1000 worth of damage.
by Stan Logan | Jun 7, 2021 | Garden tools
There was once an old man that lived down the street. Along with other home owners in the neighborhood, he had a magnolia tree growing in the middle of his front lawn. Every day I would see him wandering all over the lawn picking up magnolia leaves with a grabber. I assumed he probably was too stiff to bend over, or perhaps was fearful of doing a face plant on display for the entire neighborhood. He eventually had the tree cut down so the only time I would see him is when he would drive by. Dr. Chambers died probably 30 years ago.
I recently spruced up my front landscape with a yard and a half of mini bark from Hasties. I appreciate the improvement so much that I constantly am out there with a grabber picking up the magnolia leaves that my nextdoor neighbor’s tree provides. I wonder what the neighbors think of me?
Stan, The Old Man
by Stan Logan | Jun 5, 2021 | Garden tools
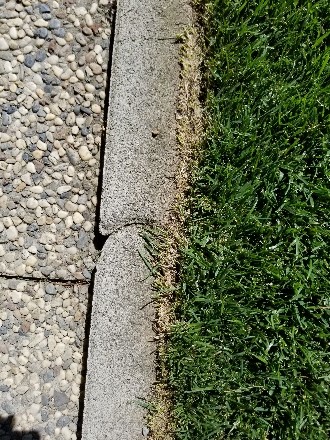
If you look at the first photo below, you can see that absolute mess I made trying to edge my otherwise beautiful lawn with a string edger. Lawn edging is something that I have never been able to do well. Well, I solved my problem. I removed the guard from the edger. Now I can actually see what I am doing, and have been able to do a good job, if I do say so myself. If you also choose to remove the trimmer guard, you must wear eye protection. I would also suggest that you floss your teeth when your edging is finished.
Stan, The Much Improved Man
Butchered lawn edging |
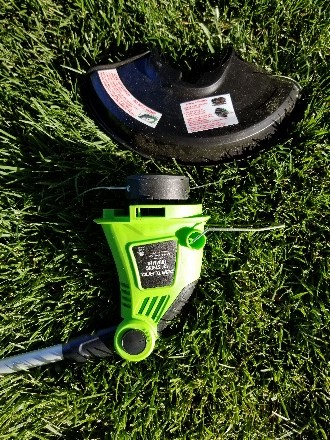 Trimmer with guard removed |
by Stan Logan | Jun 4, 2021 | Garden tools
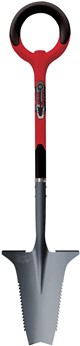
Root Slayer |
Here is another tool recommended by Anita Clevenger. The Root Slayer is a shovel with a sharp V-shaped tip and blade edges with saw teeth. It is perhaps Anita’s favorite tool because using it vastly reduces the strain on her hands and wrists. She says it’s absolutely essential for digging around trees. One of the drawbacks to this shovel is that it will slice right through irrigation lines as well as roots. Then too, the tool description says not to use it for prying action. The Root Slayer comes in 3 basic models—a straight long handle version for $47, a short heavy-duty version for $64 and a light-weight short version for $35. In Amazon’s description the light-weight shovel is suggested “for women and mature gardeners”. If you are not sure if you fit into these categories, give me a call and I’ll help you decide.
Stan, The Tool Man
P.S. A further discussion with Anita revealed that there are many models of the Root Slayer. Her model is actually the lighter version discussed above, but with a different handle than the ring handle. She feels the lighter shovel is better because it can maneuver into smaller spaces. She also indicated that this is a popular shovel with backpackers and users of metal detectors. I suspect that short 29” “Mini-Digger” or the trowel would be useful here. |
