by Guest Contributor | Mar 20, 2021 | Garden pests, Pesticides
by Niki L. Moquist, UC Master Gardener
Spring is the perfect time to inventory our garden and household chemicals sitting in the garage or garden shed shelves. These half or full containers might have sat around for a while gathering dust. These need to be disposed safely to prevent accidents and protect the environment.
Let’s define what is a pesticide: A pesticide is any substance used to kill, repel, or control certain forms of plant or animal life that are considered pests. A pest is any unwanted organism that causes problems. Most organisms are not pests or are pests only in certain conditions. Pesticides should be considered tools or steps in a process.
Pesticides include: herbicides for destroying weeds and other unwanted vegetation; insecticides for controlling a wide variety of insects; fungicides used to prevent the growth of molds and mildew; disinfectants for preventing the spread of bacteria; and compounds used to control mice and rats. They can be chemical, or organic such as neem oils. They contain active and inert ingredients, produced to be used in very specific ways.
Labels on pesticide containers give specific instructions how to use and dispose, look for the “Storage and Disposal” statement on your pesticide label. It is a good idea to learn how to read the pesticide label. Labels are there primarily to help us achieve maximum benefits with minimum risk. Both depend on following label directions and correctly using them. Follow the directions before each use and when storing or disposing the pesticide. Do not trust your memory. You may have forgotten part of the instructions. Use of any pesticide in any way that does not comply with the label direction and precautions is illegal. Improper usage may be ineffective on the pests or, even worse, pose risks to users or the environment. Labels also list if the pesticide is toxic to the bee population. It is a good idea to read the label prior to purchasing a product to make sure is effective on the pest you are trying to control. Keep product in its original container with labels intact.
Dispose of pesticides as instructed on the product label. If product label is illegible and contents cannot be identified, it is best to dispose. Some chemicals do not age well, if they have been sitting on a shelf for a while it is best to dispose. Older chemicals might have been removed from the market and it would be illegal to use them, e.g., diazinon. (The last time use allowed was 2004!). If any product remains in the old container, it must be disposed as household hazardous waste. Never pour pesticides down the sink, toilet, sewer, or street drain. Many municipal drinking water and wastewater treatment systems are not equipped to remove pesticides. If pesticides reach waterways, they can harm fish, plants, and other living things. You cannot dispose pesticide bottles or other containers in household garbage can. You need to take them to an approved Household Hazardous Waste Center. Check your local municipality for hours and sites. Never reuse empty containers.
Once ready to tackle the task, make sure to line the floor with a heavy plastic tarp. Have on hand kitty litter or sand and plenty of paper towels for cleaning spills. Lay out heavy garbage bags to form a barrier for plastic containers. Be sure to wear protective clothing when rinsing pesticide containers, such as chemical resistant gloves and eye protection to avoid contact with skin or eyes. Do not pour rinse water into any drain or on any site not listed on the product label; it could contaminate the environment. If you mixed or diluted a pesticide and you have a little too much left over, try to use it up while following the label. Consider asking a neighbor if they can use any leftover mixtures. Protect pets and children, make sure they are in the house and safe.
How to transport the old pesticides to the Household Hazardous Waste Center:
- Keep the pesticides in their original containers with the labels attached
- Place containers so they won’t shift and/or spill; you might have to fill gaps between containers with old newspapers
- Line the transport area in your vehicle with a heavy plastic tarp, to contain any spills in case of an accident
- If pesticides are carried in the back of an open vehicle, secure and cover the load
- Don’t put pesticides in the passenger compartment of a vehicle
Go straight to collection site once you have loaded the car. Drive carefully
Same rules apply when you purchase pesticides and are delivering them to your house. Place bottles in a plastic tub lined with a heavy garbage bag, to protect your vehicle in case of spills. Keep pesticides away from groceries, including food for animals.
Pesticides should be stored in their original containers. The original container is designed to protect the product and it’s made of materials that will withstand the chemicals in the product. Store containers with their original labeling which includes application and disposal directions, ingredient names and emergency information. The original container also has the appropriate lid/cap to protect kids and pets. Store in a designated place that is only used for pesticide storage, pick a well-ventilated location that children and pets cannot access, preferably with a latch or lock. Choose a location away from ponds, streams and drinking water wells.
Keep these tips in mind:
- Practice Integrated Pest Management (IPM) to reduce the use of pesticides (see below for website)
- Identify the pest and make sure the product will be effective against that pest before purchasing
- Buy only what you need for the season, mix only what you need today, follow label directions for mixing
Helpful Resources:
- For help with identifying pests and how to control them – Integrated Pest Management Program at University of California http://ipm.ucanr.edu/PMG/menu.homegarden.html
- For help in how to store, dispose, read labels on container, the National Pesticide Information (NIPC) at Oregon State University is a good source.
- Disposal Instructions on Non-antimicrobial Residential or Household Use Pesticide Product Labels –US Environmental Protection Agency (EPA
- Safe Disposal of Pesticides – US Environmental Protection Agency (EPA)
- Contact your local Master Gardeners for more information
Happy gardening and stay safe.
by Stan Logan | Mar 17, 2021 | Garden tools
Although not really a tool, plastic coated steel garden stakes certainly can qualify as a helpful item for successful gardening. The reason I am mentioning it now, is that I have recently been made aware of a deal that I would like to pass on to you. Most gardeners have a stash of stakes of various lengths. In fact many of the estate sales I’ve attended will have stakes if there was any history of gardening at the property—that along with a collection of fertilizers, chemical treatments and most importantly—gardening tools. But who currently wants to go an estate sale where you are often crowded in a house with strangers? I haven’t been to a garage sale for a year—sob, sob. Anyway, if you find your supply of garden stakes lacking, here is a source that will satisfy your needs for good quality garden stakes at a reasonable price. You can order these on line from Home Depot with free home delivery. Note that you can order lengths from 4 feet to 7 feet.
Happy staking!
Stan, The Tool(?) Man
by Guest Contributor | Mar 16, 2021 | Propagation
by LaVille Logan
For most plants there is a window of opportunity for success. I always rely on asking Google for help with this as it steers me away from mistakes. “Google, when is the best time for ________ cuttings? Often the answer is “When the plant is actively growing.” This makes it unnecessary for me to be concerned with the planting zone because the plant will be growing when conditions are good for it. Plant growth stages fall into 4 categories: herbaceous softwood, semi hardwood, and hardwood and are very important in determining whether or not the cutting will root. I will be concerned with softwood cuttings today as much of my experience is with this group. I have started clematis, forsythia, fuchsia, pelargoniums, salvia, ivy, hoya, abutilons and hydrangea this last season. (Be aware that I did not take all of the cuttings at precisely the “correct” time.) Softwood is when the young stems are just getting a little hard—not likely to dry out after they are cut. Older stems become harder and it is more difficult for them to develop roots in that stage. The softwood should snap and break when bent. You can use the same starting procedures with softwood cuttings: 1. Cutting length from 4 to 6 inches, 2. Strip bottom two sets of leaves, creating a scar to ‘work with’ the hormone, 3. Dip into hormone powder, shake off extra, and 4. Place into readymade hole in dampened potting mix. Keep cutting in a humid environment for 2 to 3weeks ( refer to blog about tote containers or use inverted Zip Lock bags. It is better if the bags do not touch the cuttings. There are many plants that will work with these procedures, but the ones listed are the plants to which I had access. Regading not taking cuttings at the ‘correct’ time–remember the windstorm? A branch of our Xylosma tree broke off, I made a 20+ cuttings, (insert unhappy emoji) they all failed, but when I trimmed back my clematis later (not actively growing, and kind of crunchy) I got two of those cuttings to grow! Yay!
by Stan Logan | Mar 16, 2021 | Propagation
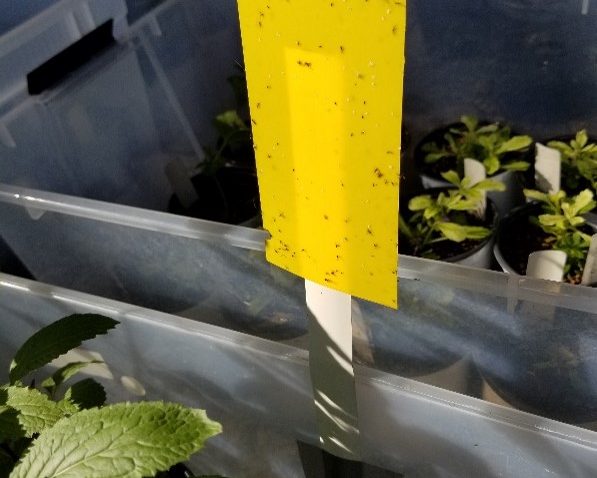
Years ago I bought a pack of 60 sheets of yellow sticky traps figuring that it was enough to last a life time. I now see that the stack of sheets is running low. I’m afraid that does not bode well for my future. But until we both expire, I’ll keep plodding along.
The reason for my original purchase was to do battle with the white flies that like to infest our iris beds. Being cheap, I always cut the letter size sheets vertically into thirds and then hung these narrow strips throughout the beds every year. That technique has worked fairly well as whenever we walk through the beds, we purposely knock against the plants, the white flies fly up and zip over to the yellow strips to which they become stuck.
When LaVille mentioned that several of the plants she was propagating started to get white fly, I cut sheets into thirds and then those strips in half. I then mounted them on miniblind stakes and taped the stakes to the sides of the totes in which the plants were being raised. Well this was only partially successful as the stakes stuck to the totes, but the mini pieces of sticky sheet sometimes did not want to adhere to the stakes. The yellow sticky sheet material is flat and likes to stay that way—they didn’t want to bend around the bent stakes. Adding blue masking tape worked somewhat, but I found small metal clips worked as a last resort.
So far, pretty boring, right? Well, look at the accompanying photo. See the attached white flies? . . . No, you can’t. They are tiny, and blend right in with the yellow mini sheet. I just took a flashlight (It’s night time) and tried to count the white flies. I figure there is at least 100 on both sides of the yellow mini sheet. Look at the photo. Guess what those dark specks are? Those are fungus gnats. It’s a 2fer! After the sticky mini strips were in place for about 4 days, no flies or gnats appeared when we brushed the plants. Adults were eliminated, so the life cycle was broken.
So if you have any trouble with white flies or fungus gnats, try using these yellow sticky traps. I have to tell you though, working with these is a real pain. I mean these traps are really sticky. You can remove sticky stuff from you fingers with paint thinner.
Well, I feel foolish. I just checked Amazon and found that there are all kinds of small yellow sticky traps now available. Not only that—they actually advertise use on fungus gnats and flying aphids as well as white flies. Do I feel out of touch!
Stan, The Feeling Old Man
Capture gnats with sticky trap
by Stan Logan | Mar 3, 2021 | Garden tools, Weeds
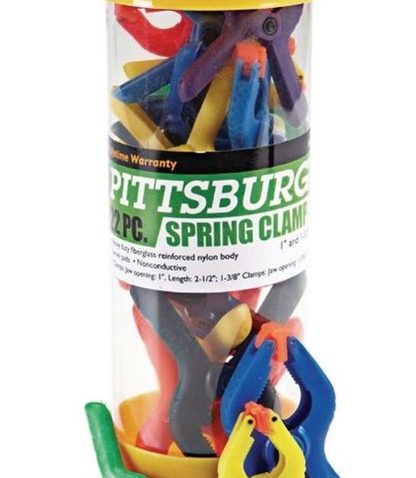
Once again it is beneficial to look outside the box. Here we have a versatile item that you won’t find in your local nursery. Please note that although labeled “Spring” clamps, these devices may be used during all 4 seasons—and especially in the Summer. You can see by the accompanying photo, that they are brightly colored, which will hopefully prevent their loss. (I haven’t seen your garden, but I suspect you may have the tendency to leave stuff all over.) This complete variety of color allows you to accessorize your gardening attire with clamps that will attach anywhere. I don’t have much capability, but I suppose you could even adorn your hair with these snazzy items. I tried this idea, but found it rather painful.
So how would you use these clamps in the garden? You could support plants. You wouldn’t pinch the plant itself—that would be cruel—but enclose the branch and clamp to a supportive structure. Using this on vines, tomato plants, and bougainvillea immediately comes to mind, but, really, any plant that requires staking would be a good candidate. Then there’s the need to attach sheet material—bird netting, shade cloth, frost protection, tarps. Could you use it to attach labels? How about hanging yellow sticky sheets. Maybe you need to close a bag of fertilizer. How ‘bout sticking one on your body to remind you to turn off the water.
I think you can see that there is almost no end to the uses for this versatile tool. You are probably not trying to decide whether or not to buy, but how many to buy. Well, the good news is that these clamps are really cheap. You can purchase a set of 22 clips for only $4.99 at your closest Harbor Freight, so don’t hold back!
Happy Clamping,
Stan, The Tool Man
P.S. If you really want to travel outside the box, google “clampers.” My brother-in-law is one of these.
Spring Clamps
