by Stan Logan | Mar 19, 2020 | Garden tools
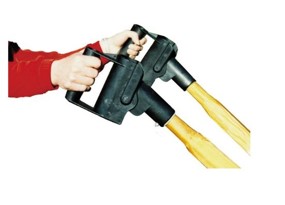
Here is an innovation designed for the gardener who moves so much material that a wheelbarrow is required. You (the heavy duty gardener} have undoubtedly been faced with the awkward task of dumping your load (so to speak). You reach the desired dump location, raise the handles, but nothing spills out. You have to raise the handles to a vertical position, but your hands are on top of the handles when you lift. You have two choices–either lift with such force that the wheelbarrow flips forward, or allow the handle ends to pivot in the palms of your hands so that you are gripping the handles from beneath. The first method is sometimes exciting when the wheelbarrow either drags you over on top of it, or it flips back at you. The second method is scary because it can result in slivers in the palms of your hands if the wheelbarrow has been out in the weather for the last seventy years. (My wheelbarrow was old when my dad gave it to me.)
The solution to the problem, my hard working friend, is Pivoting Wheelbarrow Handles. These are handles that fit over the ends of your wheelbarrow handles. Since they pivot, you have control when lifting from above and as well as shoving from beneath when the handles move through a vertical position. You cannot believe the difference it makes in controlling your wheelbarrow through the entire dumping process.
“But I don’t own a wheelbarrow.” you say. Well, if you have grandkids or pets, imagine the fun you will have wheeling them around the yard and even the neighborhood. And then when you get tired, it is so easy to dump them in an appropriate spot like the swimming pool. I’m not going to suggest a particular wheelbarrow. I think you need to select it on the basis of the occupants.
I will, however, help you with the purchase of your pivoting wheelbarrow handles. Simply Dump it Wheelbarrow Handles SDI1001 can be purchased from Amazon for $18. Is that simple, or what?
Happy dumping!
Stan, The Tool Man
P.S. Actually, since I wrote about these handles years ago, they have come out with wheelbarrows with looped handles that deal with this dumping dilemma. So if you are going to buy a new wheelbarrow, this would be a good option.
by Stan Logan | Mar 19, 2020 | Garden tools
Now here’s a must tool for the iris lover. Irises have to be dug up or at least thinned about every three years. Crowded irises have few blooms. A spading fork is the preferred tool for this chore. It will lift the plant and leave much of the soil behind. I have found that there is an advantage to having a fork with only 2 tines. I can more easily maneuver between adjacent plants when just removing outer rhizomes. But the main advantage to having only 2 tines is that it is twice as easy to penetrate the soil. By cutting off the outside tines and leaving the horizontal bar that connected them, you still have a bar upon which to shove with your foot.
So how can I get a two tiner, you ask. Simply give me a call or e-mail. I will modify a fork you already have, or see if I can get one at a garage sale for you. If you have an angle grinder with a cutting disc, have at it yourself. Remember to remove sharp edges.
None of this appeal to you? Fine. Keep using that favorite shovel or fork that you’ve used for years. Often change is an uncomfortable experience. I understand.
Stan, The Tool Man
by Stan Logan | Mar 11, 2020 | Garden tools, Weeds
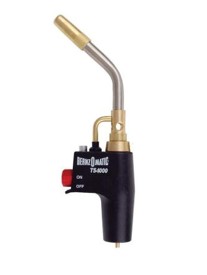
Torch |
Well, this tool is not for everyone. It is the propane torch. If the height of your weeds rivals that of your cultivated plants, this is not a tool for you. If your favorite weeding tool is a scythe, this is not a tool for you. No, this is a tool limited to the OCD. The propane torch is also generally best suited for urbanites. Do you have small weeds growing in the joints of your side walk? Perhaps weeds have found the cracks in the driveway. Are pavers a part of your landscape? Do the weeds love your gravel paths?
I can you hear you saying, “Ever hear of Round-Up?” Well, does Round-Up kill weed seeds? No. There is a particular thrill in hearing the popping of weed seeds as you apply the flame of your torch. I also don’t like to wait days to enjoy the sight of a defeated foe. This tool meets the high standards of an immediate reward society.
So what is a propane torch? It is simply a nozzle that screws onto a tank of propane. You can buy a nozzle for less than $15. But I want you to spend more. The extra cost will allow you to turn the flame on and off with the mere push and release of a button. This is an important safety feature in that the flame is not burning when you are not using it. You are able to move all over your garden (or neighborhood) and use a flame only when needed. This lets you use very little gas to eliminate thousands of weeds. I have been using the same tank of gas for 10 years. I finally stopped buying propane tanks at garage sales—the count stands at 9 tanks. Home Depot has the Benzomatic Sure Fire Torch Head for $34.97. Ace Hardware has its own Instant On-off Propane Torch Head for $37.99.
Now there are limitations to weeding with a propane torch. You cannot burn weeds growing near flammable material such as dead leaves, bark, fences, and spreader boards in concrete slabs. You cannot burn a weed growing next to a drip tube or soaker hose.
I do have to warn you of a potential danger. When you come to enjoy using this tool to the extent that your yard is devoid of weeds, you may find yourself searching for weeds in the sidewalks and driveways of your neighbors. If you suddenly look up and realize you’re lost, fear not. Like the proverbial trail of bread crumbs, simply follow the path of blackened annual rye and spurge back to your house.
In summary: What makes this garden tool so special? The propane torch eliminates weeds and viable weed seeds in seconds, particularly when the substrate cannot be penetrated by a conventional weeder. It is an environmentally friendly treatment. You are able to cover a lot of garden area without getting on your hands and knees. It’s strange that someone hasn’t developed a specialized rack for displaying this efficient weed killing weapon for the rear windows of gardeners’ pickups.
Happy burning,
Stan, The Tool Man |
| |
|
by Stan Logan | Mar 11, 2020 | Garden tools, Weeds
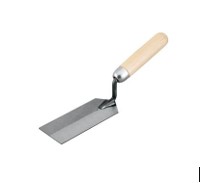
I hope you are not limited to thinking that only garden tools can be used in the garden. This 2 x 5 inch rectangular hand trowel that is generally used for working with mortar, thin set, and other pasty construction substances is a must for your garden tool collection. This inexpensive tool has many uses in the potting shed and garden. Having straight edges makes it useful for any scraping chore—for instance cleaning emptied terracotta pots, clearing a work surface, or removing unwanted accumulations from the bottom of your garden clogs. Black widow spiders and their nests are easily squished. In the garden this trowel can be used as a weeder. It will scrape the soil harboring small weeds that are right next to a threatened plant. It easily slips under a drip line or soaker hose. It slices easily through soil since its blade is so thin. Flat spreading weeds such as spurge and invasive baby tears can be lifted up with a small amount of soil while minute seeds are removed at the same time. Sharpening the edges of this tool makes it even more effective and I can do this for you. Sandpaper quickly removes excess rust for those of you who prefer to store tools scattered around the garden.
For less than $10 you can buy a 2”x 5” Margin Trowel for yourself and one for all of your family members and friends. They are available in both Home Depot and Lowes, and of course, Amazon.
Thinking outside the box,
Stan, The Tool Man
by Stan Logan | Mar 11, 2020 | Destination Gardens
For those of you who are looking for an unusual garden tour—do I have one for you!
The Vallarta Botanical Gardens in Puerto Vallarta, Mexico, is a wonderful destination for the gardening enthusiast who doesn’t mind a little travel and who enjoys the experience of different cultures. Let me describe a little bit about what this excursion will entail:
First of all, you will need to become comfortable with using Uber. So, if you haven’t used Uber before, download the app and take a few short rides until you are familiar with the process. Arrange your trip to visit during winter months—that’s when you will want to get out of the dreary Valley, and also when very little is happening in your garden. There are all kinds of accommodations in PV—resorts, time shares, hotels, B & B’s. Check out the map location before you book—you want to benear the downtown area. Two good suggestions if you don’t have time share points to use: the Hotel Rosita and Hotel Posada de Roger. Both are less than $100 a night. Make your reservation well in advance—one year ahead would be good.
A week before you leave, order Mexican pesos from your bank. The exchange rate will be better than that in Mexico.
During the flight to PV, you will be given a customs form to fill out. You will show that form at the airport and they will give you a part of that form you will need to leave Mexico. If you lose that form, it will cost you $30 per person for another form in order to receive your boarding pass to leave. (Yep. That’s what happened.)
Now, when you arrive at the PV airport, you will get your luggage and head for the exit. On the way out, you will be accosted by time share personnel who will try to get you to sign up for a presentation. Do not stop—just keep walking out the doors. Then outside, individuals wearing official taxi outfits will try to usher you into a taxi. This is complete rip off. Walk out of the terminal and turn left with your luggage. Cross over the boulevard on the bridge and make your Uber call to get picked up. You see, Uber drivers are not allowed to pick up on airport property, but they can deliver you when you return—what a racket!
To be safe, avoid drinking water unless it is filtered at upscale resorts. Bottled water can be purchased everywhere, like at the omnipresent OXXO stores.
When you get settled in your new digs, you will want to plan adventures other than the Botanical Gardens. I would suggest a Vallarta Eats Food Tour—all of the guides are fantastic. Walk the Malecon—a beachfront walk with great shops, restaurants, and numerous sculptures. (Eat at least once at Casa Traditional). Rhythm of the Night is a fantastic artistic show and dinner held at a private beach to which you will ferry across the bay. The Canopy Zip Line is a great experience, but you must be fit, because significant climbing is required. At the zip line conclusion, eat at the restaurant, do some tequila taste testing, and visit the tiny marmosets that will climb over you as they lick fruit juice out of a cup. Puerto Vallarta has numerous opportunities for whale watching, fishing and snorkeling. If you never driven an ATV, here’s you chance. Note that it is best to schedule activities on days other than Wednesdays when there are frequently cruise ships in the port.
OK—enough fooling around. It’s time to go to the Botanical Gardens. You could take a taxi or Uber, but instead take the local bus. The bus stop is at the corner of Cananza and Aguacate streets in the Romantic Zone. The bus runs every half hour. It will cost you big 30 pesos—which if my math is right, is about a dollar fifty. When you get to the Botanical Gardens, do not be tempted to walk the vanilla groves—that path is a killer unless you are in great shape. Wander through the impressive grounds and green houses where an unbelievable number of plants are well labeled. Eat at the large restaurant and cruise the extensive gift shop. Use the bus to return to town and get an Uber to your digs.
I hope you will use this garden tour as an excuse to enjoy a wonderful vacation in Puerto Vallarta. It is LaVille’s and my favorite place to visit.
Stan, The Traveling Man
by Stan Logan | Mar 11, 2020 | Garden tools
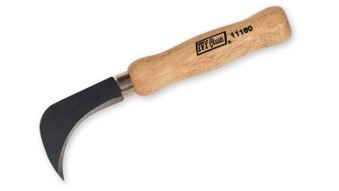
Now here is a tool that you would probably never use—but I do, so there’s a slight chance you might. First of all, you have to have a lawn. I figure that would eliminate many of you who have done the responsible thing and eliminated your lawn. (Did you ever read my blog article explaining why I love my lawn?) Second, you have to enjoy working on your hands and knees. So, let’s say that there is a 10% chance that you are still interested in continuing. Finally, you have to possess a certain amount of OCD. So for the 2% of you who remain, here is why you need this tool:
Do you have a string lawn edger? I do. I got it as a garage sale. It is supposed to advance the string by bumping it on the ground. But it doesn’t do that. I have to turn it upside down and manually advance the string. Then sometimes the string breaks within the spool. So I have to take it apart to extract the string again. That’s a pain. Then when I do use the edger, the resulting edge is rather ragged—hardly OCD worthy. So, what I do is get on my hands and knees, take my linoleum knife, and draw it towards me along the inside of the mow strip. (Oh, I forget that is another requirement for needed this tool—you have to have a paver or concrete border for your lawn.) Now as I pull the knife towards me, it makes a straight cut through the grass creating the perfect edge to my lawn, which I then stand back and admire.
Now here is my last chance to interest you in this tool. Sooner or later you will likely need to patch an area of your lawn with sod. (I like the sod from Home Depot, but make sure it is fresh.) The sod is held together by a nylon mesh. You will find that this linoleum knife is the perfect tool to cut your sod into pieces that will fit the section you have carved out of your damaged lawn.
Keep the inside of the knife sharp by using a file. . . . . You don’t have a file? Well that was simply the last straw. Now . . Nobody is left to use this tool in the garden. . . . I’m so sad.
Stan, The Tool Man
Garden uses for linoleum knife
(Perhaps you should buy this model from Amazon for about $4. Can you imagine how impressive this would look in your tool collection. But hurry—there are only 4 left of this model as of this writing!)
by Stan Logan | Aug 19, 2018 | Garden tools
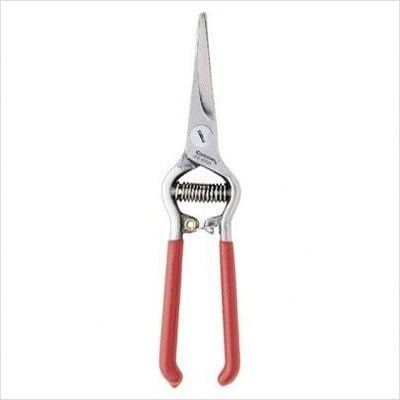
I had 13 hand pruners . . until I brought a lot of them to the Tools and Treasures table. What is surprising is that I only used one of them 95% of the time. The Corona Thinning Shear is the one tool that really makes me panic when I lose it some place in the garden. It is small enough to hide in mulch or in a pile of clippings. But smallness is one of its attributes. I imagine that most of you garden with your pants on. By that I mean you wear pants with pockets. The slender profile of the pruner allows you slip in your rear pocket. It doesn’t stick out far and catch on anything. The blade tips are rounded so there is no danger of immediately creating a hole in your pocket or tender parts. The other feature that makes this a “must have” for me is the fact that the cutting blades are long and thin. You can reach into tight spaces. Cuts can be made close to an adjoining stem. Yet the blades are strong enough to cut through thick plant material. I have to admit that I also occasionally use it closed as a weeding tool particularly between pavers. Also with closed blades you can jam it into the soil to loosen a stubborn weed. Although it’s hard on the cutting edges, this is the best tool I have for cutting off oak tree seedlings beneath the soil. Fortunately the straight blades are easy to sharpen. I use this “thinning shear” to clean up cannas, prune grape vines, gingerly trim quince, cut back new growth on cherry and plum trees, and even prune the roses. Yeah, I know I should use a knife edge bypass pruner, but this practically perfect pruner is already in my back pocket so that is what gets used. OK, why isn’t it absolutely perfect? If dried plant juices build up on the blades, the blades will start to stick. Use either oven cleaner, WD-40, or carefully sandpaper the inner surfaces to remove the buildup. You also have to remember this is a light weight pruner. It will not cut through a hard, woody stem generally thicker than ¼ inch. It’s at this point that I bypass the bypass hand pruners and reach for a lopper. I love my thinning shear. I feel it is a “must have” in your arsenal of garden weapons.
Convinced? This tool is available at Amazon as FS-4350 Thinning Shear and, wisely so, is Amazon’s Choice at less than $20.
P.S. If you are looking for an entertaining activity at a party, this pruner is invaluable. Stun you guests with the disappearing pruner trick like I showed you when I deftly slipped the pruner into my back pocket. You can create a contest by seeing which guest can perform this trick the fastest. (It would be sad if you thought for a moment that I was serious.)
I hope you’re not a dead horse. I cannot help but to continue to work on you to buy a thinning pruner. In the last two days I have used mine to cut out the dead woodwardia fronds, to trim back a grape ivy in a hanging basket, to prune lightly forsythia and the yesterday, today, and tomorrow, to cut back the flowering quince and to dead head canna. Finally this morning I tackled the grape vines on the pergola in the back yard. Every year at this time I have to remove all the moldy grapes that have developed. Poor air circulation ruins the crop each year. I have to climb a ladder and reach up through 2 x 4’s to cut grapes out. I suddenly realized why I treasure my pruner. It increases your reach. It’s like reaching out with a pair of scissors. So if you have light pruning to do, or pruning that requires reaching between thorns, objects, or other branches, this thinning shear is for you. It is not for pruning roses and it will not cut woody stems much larger than ¼ inch, but if your garden is anything like mine, there are almost endless uses for this great tool. And, remember how easily it fits in you back pocket?
Once again, it’s available on Amazon—Corona FS-4350 Thinning Shears.
Happy Pruning, Stan
4350 thinning shears
by Stan Logan | Aug 19, 2018 | Container plants
Pot Bound?
No, I’m not asking whether you are heading to the closest pot dispensary. Nor am I referring the condition of a plant that has cemented itself into a pot with excessive root growth. I am asking if you are bound to your garden because you have so many potted plants that you can’t go anywhere because they have to be watered so often.
I suspected we had pot bound disease, but it really came to light as we left the last SPPC meeting. I was trying to get rid of some pots left over from the tools and treasures table, and I asked Pat McKnight if she wanted a pot. She exclaimed that the only plants she had were in the ground. What a smart lady! On the other hand we have pots . . lots of pots. I decided to count them and I came up with over 200. So if anyone is pot bound, it is we. This year we scheduled no trips between March and August. In August we have a gardening friend who will come over a couple times to keep all the potted plants alive. My goal for the future is to reduce the number of potted plants so that we will be vacation bound when the weather heats up. What’s your situation? Do you likewise feel the urge to be pot free?
Stan
by Stan Logan | Aug 19, 2018 | Container plants
If you want to seal a clay pot so you can apply mosaic materials, or if you simply want to cut down on the water loss through the pot wall, there are many products designed for this purpose. For instance, if you Google “How to seal flower pots,” you will see a product called “Clay Pot Sealer” that is available at Walmart. The site also explains how to apply it. If you have left over granite or grout sealer around, that will also work.
by Stan Logan | Jul 5, 2018 | Recipes
Almond-Chocolate Truffles
Servings 24
Ingredients
1/3 cup chopped and pitted soft dates
1/3 cup raw cashews, soaked in hot water for 3 hours and then drained
3 tablespoons almond butter
1/2 cup unsweetened cocoa powder
1/4 cup date sugar (can substitute brown sugar)
1 teaspoon vanilla extract
Ground almonds for coating
Instructions
Combine the dates and cashews in a food processor and process
to a paste.
Add the almond butter and process to combine. Add the cocoa powder, date sugar, vanilla and 1 teaspoon of water. Pulse until well combined.
Pinch some of the mixture between your fingers to see whether it holds together.
If it’s too dry, add a little more water, 1 teaspoon at a time, until the mixture can be shaped into balls.
If the mixture is too soft, refrigerate it for 20 minutes or longer to firm up.
If it’s still too soft, add a little more cocoa powder, 1 teaspoon at a time.
Use your hands to shape and roll a small amount of the mixture into
a 1-inch ball and transfer to a plate.
Repeat until all the mixture has been rolled into balls.
Place the ground almonds in a shallow bowl. Roll the truffles in the almonds until they’re coated, pressing on them if needed to cover completely.
Transfer the coated truffles to a plate and refrigerate until firm before serving.
Recipe Notes
Note: If your dates are not soft, soak them in hot water for 20 minutes; then drain and pat dry before using.
From: The How Not To Die Cookbook, by Michael Greger, M.D. & Gene Stone
