by Stan Logan | Jun 30, 2021 | Fertilizer, Garden tools
I know you may not be willing to admit it, but I know there is a chance that you have Jobe’s fertilizer spikes. I can understand your reluctance to fess up considering the presentations that have been given by the perennial club. In June you heard a program on composting in which the use of chemical fertilizers was discouraged. Not too long ago, Pam Bone told you the uselessness of driving fertilizer spikes around trees because so little area of the root zone was affected. So, what are you doing to do with these things other than let the box continue to collect dust amongst your garden supplies? Well, let me tell you:
First of all, do you have the spikes for “beautiful evergreens” (16-4-4) or for “lush fruit & nut trees” (10-15-15)? This obviously will determine where fertilizer will be applied.
Second, do you have a hammer? If so, this is what you should do. Lay out a spike on a hard surface and beat it with the hammer. Your sidewalk out front may be a good place. You may gather a curious crowd of neighbors, who will immediately scurry off to seek out their own dusty box of fertilizer spikes. Now, you will find that bits and pieces of fertilizer will fly about and wearing googles is advised. It adds interest to the spectacle too.
Finally, apply the broken-up fertilizer bit to your plants. Now, here’s what I do with our citrus trees. I break the spikes into 4 pieces. I gather them into a bucket and walk amongst the trees and toss the chunks around the drip line of the trees so that whole ground area is evenly covered. I then take my hammer and bash them down into the soil. I time the application so that the soil is moist and soft, but not so moist that walking about compresses the soil. There is a pretty good layer of bark covering the ground, but I just smack the chucks down through it. I have to admit that I find this procedure rather enjoyable.
If you are applying the fertilizer to plants around your yard or potted plants, you will want to break up the spikes into much smaller pieces as I have shown in the photo. I used the chisel, but that isn’t necessary. LaVille has found it to be affective to shove small chunks down the sides of pots. You will have to decide how small the chunks should be and how much to apply, but then that’s the challenge, right?
So, what are you going to do with the mess of powdered fertilizer dust left on your sidewalk? Sweep it up and scatter it around your garden. On second thought, perhaps your front sidewalk is not the ideal hammering area as you wouldn’t want any fertilizer to end up in the gutter and on to our rivers and streams. You should probably do your spike bashing in the back yard. That way no one will think you are too cheap to buy a proper fertilizer.
But Stan, you say, why did you buy fertilizer spikes? Estate sales—I cannot resist a bargain. You would be surprised to see how many estate sales have dusty old boxes of unopened fertilizer spikes. Don’t let that happen at your estate sale.
Stan, The Hammer Man
by Stan Logan | Jun 26, 2021 | Garden tools, Weeds
Somehow it is ironic—instead of me describing a tool that I feel you need, but don’t have, here is a tool that you do have, but probably don’t need. Unless you have steadfastly held onto the eating habits of your Neanderthal ancestors, I’m betting that you have at least one set of eating utensils in your home. It is the dinner knife that I am singling out this time. I have found that this is the best tool for teasing out weeds from ground cover. Now, if you don’t have ground cover, stop reading and go out to your garden and do something useful—take a flashlight if it is dark.
Since you are still reading, you must have ground cover . . or are just too pooped to crawl out to the garden again. Now the term “teasing” is a biological dissection term for the act of carefully separating the organs of small specimens with pointed tools like probes or dissecting needles. Every time I use a dinner knife to tease a weed out of desired ground cover plants, I cannot help but be reminded of my first biology dissection where I cut through the dorsal surface of a preserved earthworm and teased through the connective tissue until I found the two lobed brain and the nerve cords that led down and around the pharynx. Hmmm . . . you don’t have those same memories
Back to the garden: The way you use your knife to tease is to grab the offending weed and pull gently while you work the knife down into the root area and move it about. If you are successful, the weeds will be extracted and the ground cover will remain intact. If you are unsuccessful, the stem of the weed will break off only to regrow when you aren’t looking. Now I will be the first to admit that this is not a pleasant gardening chore. You are on you hands and knees with you nose to the ground (not literally). Even using knee pads does not appease my knees which insist on complaining for hours afterwards.
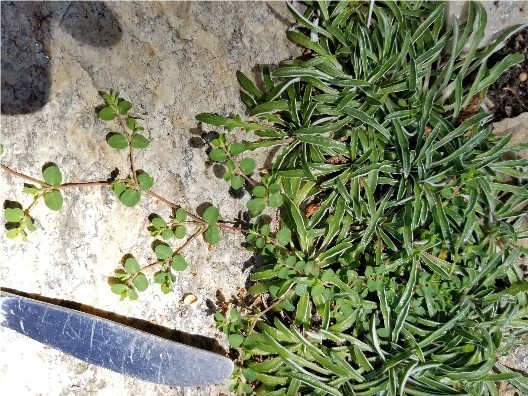
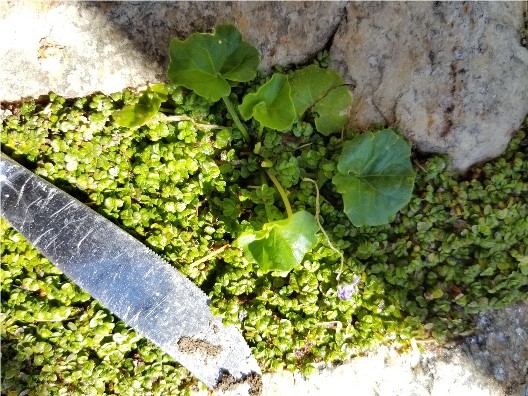
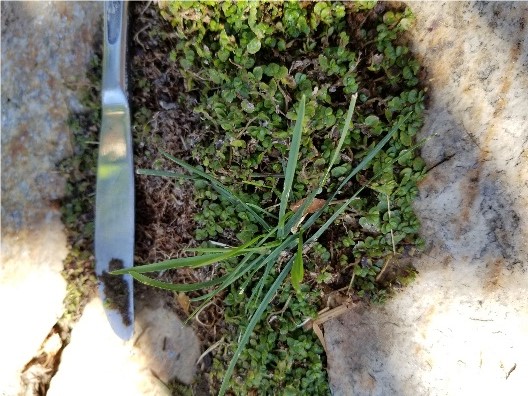
I have included 3 examples of weeding that recently required teasing in my garden. I always refer to the ground cover plants as conspiring plants as they seem to delight in hiding offensive weeds until they grow into maturity.
You know, if using grandma’s sterling dinner knife seems disrespectful, drop by a thrift store and pick up a strong stainless steel model, but watch out for impulse buying!
Stan, The Tool Man
|
 |
 |
| Spurge in Dimondia |
Australian violets in baby tears |
Grass in baby tears |
by Stan Logan | Jun 20, 2021 | Butterflies
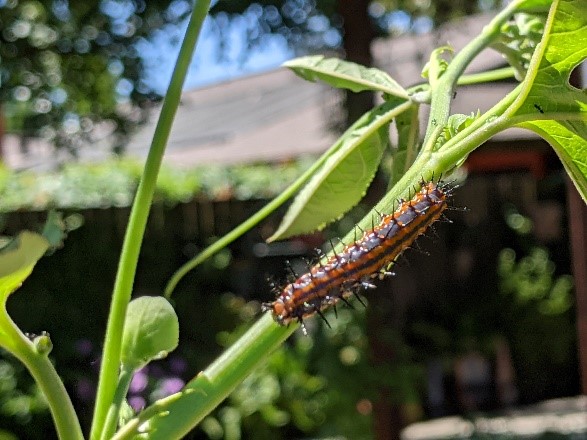
Today (June 16) my wife is thrilled. Caterpillars are eating her passion vines. Not only that—the adults are doing a little dance to spread their pheromones. Soon there will be Gulf Fritillaries all over the back yard. If you are interested in attracting butterflies to your yard, your best chance is to grow either Passiflora caerulea or Passiflora edulis in your garden. Many other passion vines are not attractive to this butterfly, especially those with red flowers.
LaVille will not have vines available at the upcoming Fall sale, but if you are eager, you can come over to the house and she can give you cuttings to give you a head start on next Spring’s growth. I suggest you come early while there is still plant material left over from voracious larval munching (just kidding).
Stan, The Happy Husband
Caterpillar on Passion Vine
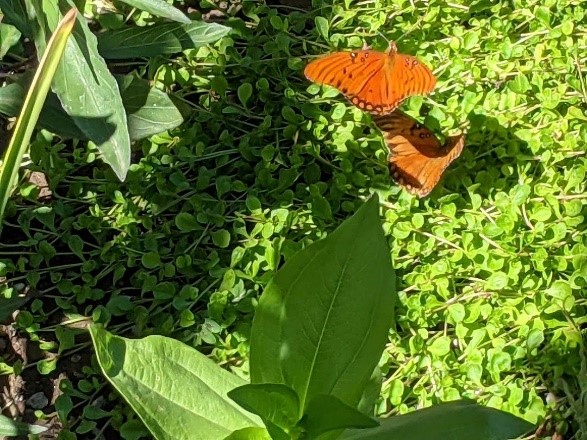
Gulf Fritillaries
by Guest Contributor | Jun 19, 2021 | Propagation
by LaVille Logan
If you have read Pot and Re-pot (Blog #4), you’ll realize that I use a lot of containers of different sizes. Keeping these organized and available for re-use can be a chore. I use and re-use the smallest sizes constantly. I do not sterilize between uses, but Stan retrieves the used cups from a plastic milk crate and while seated on an upturned 3 gal. bucket, washes them over the lawn and scrubs each out with a circular brush. He stacks them in the crate again. I have so many he has only had to do this twice. I use the same crate to stack the used ones, and the stacks get tall but one crate seems to be just fine. (I wonder how long it has been since milk crates have been used for hauling milk). The larger 1 and 2 gal. pots are stacked against our side fence. Since many plants are sold in the larger sizes, we need to replenish them, and many trips to the local nursery to check the recycle bin has kept our supply healthy. Go out to your storage area to see if you have something like a milk crate in which to stack smaller useful square or round pots. Taking and planting cuttings is complicated, and it helps to keep the many necessary items in some sort of order.
by Guest Contributor | Jun 18, 2021 | Propagation
by LaVille Logan
Choosing the right container for your cuttings will increase success and keeping an eye on root development is necessary. Knock the plant out of its pot to see if the roots are filling up.
- Choose a pot at least 2” to 3” larger. Any larger encourages over watering.
- Put a bit of E.B. Stone Sure Start on the new mix so roots come in contact.
- For anything but a tree, 1 gal. is a large enough pot. This keeps the digging reasonable when placing in garden.
Save your used containers. Rinse them out, use again. I have used my smallest containers over and over.
